by Jen_F | Coconut, Jen_F, Main Meal, Recipes
Sorry I don’t have nice pictures. Who knew I would end up sharing this recipe to more than just the family. lol – I do have not so pretty pics down below the article. Next time I make these I will try to remember to take pics as I go. ;-(
I made up this recipe as I went, so just go with your own style — change up the meat, use sausage of your choice, whatever … I’ve used Italian Sausage, turkey sausage and now chicken breast. If you’re a beef eater (which I am not), you could use ground beef or even shredded— same with pork)
You can mix match the beans (red, kidney, black, etc…)
… probably could use shredded cabbage instead of spinach ( I haven’t tried that but am sure it would work) or any vegetable or NO vegetable at all… I used to make them without- but add it now to give Deb a small amount of veggie.
The filling will fill about 24-28 6-8″ burritos and will freeze fine – for each burrito I use a heaping – I say LARGE-LARGE HEAPING tablespoon of the filling
If making for 2 people, I would say do one of three things:
#1 just throw in the serving size of meat you want, with beans, avocado, serving size of spinach, spices to taste and run with it.
#2 Divide the recipe into 3rds
#3 Or make the whole batch below, figure out how much you used for your taco shells or tortillas and then freeze the rest in that size portions.
… but below is what I do for my sister Deb once a month.
Filling:
(2 1/4 lb meat of choice) I used 3 large sized chicken breasts that weighed about 2 1/2 lbs total)- lightly boiled until done- sliced thin across the grain so it’s pretty fine pieces for the most part
Approximately 2 1/2 cups home cooked black beans/red kidney beans or 2 cans black beans/kidney beans STRAINED/drained
2 ripe avocados
Full bag of spinach (this is optional)
garlic, garlic, garlic and a little more garlic
(I use 5 or 6 cloves chopped up)
1 to 2 cup(s) shredded Mexican cheese (cheddar, Monterrey jack, most any cheese would work as I’ve used a variety over the last year)
2 TBS paprika
3 TBS cumin
3 TBS chili powder
1 TBS rubbed sage
1 TBS Oregano
1 tsp ground fennel (optional)
Mash the strained/drained beans
Mash the avocado
Lightly steam spinach and then let cool and squeeze out liquid
Slice, shred or chunk Chicken (your choice)
Dice up the Garlic (I do it to taste, so add or take away as much as you want or leave it out)
Throw everything into a big bowl, stir it up well to mix and then refridge overnight.
NOTE: Filling should be firm, not be ‘soupy’ which is why I drain the beans and squeeze out the spinach.
I let the filling stand in the fridge over night, then make the tortillas the next day.
Once the tortillas are made, get a large serving spoon, dollop a spoonful on the edge or the tortilla, roll it up like an enchilada and set aside. Move on to the next tortilla until they’ve all been filled.
Now you can freeze them (with rolled edge down) or brown them in the skillet and serve (but you don’t have to brown them if you don’t want to. I just like mine crispy on the outside)
Down below is a pic of them in the freezer. As you’ll see, I roll the edges in. It helps keep them from leaking out when browning.
I brown them on four sides, takes about 4-5 minutes for each of the four sides.
Sister Deb eats one at lunch most every day and it’s diabetic friendly.
To make Paleo flourless tortillas: (For the original recipe, go here)
~~~~
Makes: Four 6-8″ Mexican tortillas
Ingredients:
• 2 eggs
• 1 teaspoon melted coconut oil (or melted ghee)
• 1/8 teaspoon baking soda
• 1/4 cup arrowroot powder
• 1 teaspoon coconut flour
• Pinch of salt
* 1/2 tsp cumin
* 1/2 tsp chili powder
Directions:
Crack the eggs into a medium-sized bowl and whisk in the melted ghee.
Add the dry ingredients and beat well to combine. In a small (6-8″) skillet over medium heat, pour in about 1/4 of the batter and immediately roll it around to evenly coat the skillet- flip once it is set on top –(like cooking a pancake)
Here are two rough pics.
#1 I am not a photographer and only have a phone to take pics with
#2 Since I don’t use my ice maker, I took out the bucket and use that area for my freezing of things like this.

This pic is before the spinach is added
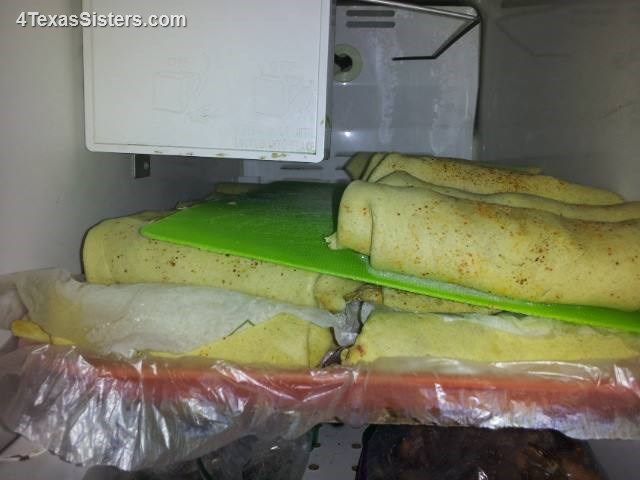
In the freezer. After they are frozen, I put them in baggies, ready to pull out, brown and eat.
by Jen_F | DIY, How To, Our Art, Shari_T, Transformations
From tacky to happy……
Thought I’d share my recently completed transformation.
It was a sad 70’s or early ’80’s end table that had seen better days. My plan was to love it back into use as a pet kennel for Spirit.

The inner shelf was completely removed, as was the glass panel.
I used a blue chalk paint and followed that with a black glaze to give it its current look. It appears a dog may have “loved” it in the past as there were chew marks on the corners. I chose to embrace those rather than repair them, and let he glaze settle in those areas.

The glass was replaced by a piece of plastic which we had purchased when Zazzy the cat was little to protect her from falling off the balcony.
This plastic sheeting allows plenty of light and airflow.
The hardware was spray painted with a specialty black paint known as “hammered”. It helps hide any imperfections.

So, how did it turn out?
Of course, the real question is: did Spirit like it?
You tell me.

Love,
Shari
by Jen_F | Coconut, Desserts, Jen_F, Recipes
I forget where we found the original recipe, but after a few changes here and there, I thought it worth sharing on our blog because it really is a great dairy-free, eggless, gluten free chocolate fudge brownie recipe.
Prep Time: 30 minutes (about)
Cook Time: 30-45 minutes
Yield: 16-20 dependent on the size of the slices
Ingredients:
3 oz. unsweetened baking chocolate
6 tbsp almond milk (you can substitute coconut milk here)
5 tbsp coconut oil
1 cup honey (vegan option: 1 cup maple syrup)
1 cup mashed cooked sweet potato (about 1 medium sweet potato)
(Note: You can substitute the sweet potato with Acorn Squash, Butternut Squash and even with Pumpkin)
1/2 tsp sea salt
1/2 tsp baking soda
6 tbsp unsweetened cocoa powder
6 tbsp coconut flour
6 tbsp tapioca flour
2 tsp vanilla extract
1/2 cup chocolate chips (optional- for a definitely sinfully chocolaty experience)
Other optional suggestions:
2 tsp Orange Extract (or to taste)
or 1 tsp Hazelnut Extract (or to taste)
or 1-2 tsp Raspberry Extract (or to taste)
1-2 tsp of instant coffee (flavored or plain — decaf or regular — or to taste)
Instructions
Preheat oven to 350 F.
If you don’t have already mashed cooked sweet potato, take one medium to large sweet potato and cut cut into 1-2″ pieces. Steam for about 30 minutes or until soft. Let the potato cool slightly then scrape the skin off from the sweet potato. Mash with a fork and then set aside 1 cup of mashed sweet potato.
(Sweet potatoes can be frozen also, so I steam several at a time and then prep, measure and freeze in 1 cup servings for a later use.
Some recipes call for microwaving your potato but personally if you’re a true health nut, we don’t mess around with the microwave as it changes the molecular structure of anything placed into it)
In a double boiler (or a metal mixing bowl resting in a pot of water), melt the unsweetened baking chocolate, almond milk and coconut oil over medium heat.
Once the chocolate has melted into a uniform mixture, remove from heat.
To the mixing bowl, add the honey or maple syrup, mashed sweet potato,vanilla, salt and baking soda. Blend well with hand immersion blender.
Slowly add the cocoa powder, coconut flour and tapioca powder and mix with a rubber spatula until uniform.
Optional – for double chocolate brownies, fold in half a cup of chocolate chips.
Pour batter into a 9″ x 9″ baking pan. Or round cake pan works nicely also.
Bake for 30 minutes or until testing with a toothpick or knife comes out clean.
Sometimes I have to bake them for up to 45 minutes. Since I’m not a scientist, I can’t tell you why the time varies.
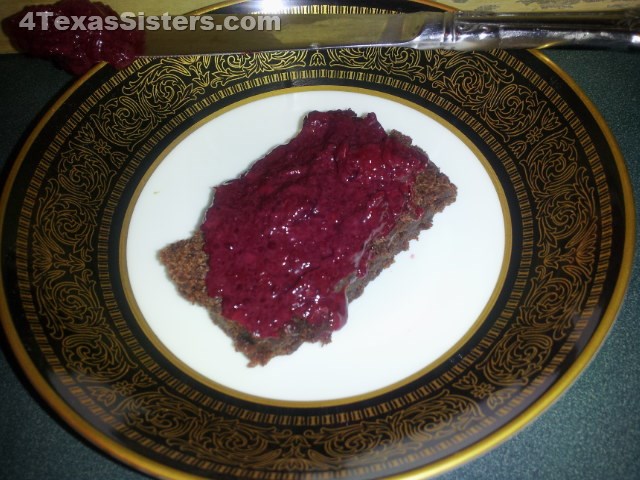
Cool and cut into squares. Enjoy!
These are great and have always been a crowd pleaser
A few weeks ago, Deb made homemade Raspberry and homemade Strawberry Jam using Chia…. which, by the way, is absolutely awesome spread on these delicious brownies.
Til the next time!
You’re never too young or too old .. So
Live Every Moment,
Love Beyond Words,
Laugh Everyday,
~Jennifer
by Jen_F | How To, Jen_F, Musings
If you have ever tried growing an avocado seed in a cup of water, this post is for you.
Here’s our avocado.

This is the traditional method.
Insert 3 toothpicks into the seed, then place the seed in water

Here’s the other method which I think is great-
Wrap the bottom of the seed in a paper towel or
brown paper bag.
Moisten the paper. Insert the seed in the plastic bag,
close the bag, and then tape it to a window that gets plenty of sun.

Now you just wait and watch

On the right hand side is a seed that has already
sprouted. On the left had side is a new seed.
You never have to worry about adding water because the
moisture stays in the bag, giving the seed the constant
water it needs.
By the way, I’ve done this with Mango seeds also and have a cool Mango tree now growing in a pot.
Til the next time!
You’re never too young or too old… So…
Live Every Moment,
Love Beyond Words,
Laugh Everyday,
~Jennifer
by Jen_F | Fruit, How To, Jen_F
I love apples as a snack and so I’ll cut them up, put them in a plastic container and then snack from the container throughout the day.
This works at home, but when I’m traveling, I hate carrying that extra, really needless, container around, so I dump all my sliced apple pieces in a baggie and of course, by time I am ready to eat my apple, it’s turned brown.
I saw this somewhere recently and just had to try it –
You’ll need four things:

Cutting board
Apple Cutter
Rubber Band
Baggie
Wash your Apple

Slice it

Put it back together, then put it in your plastic bag and you’re ready to travel.

It’s great for kid’s lunch boxes too.
Til the next time!
You’re never too young or too old! So…
Live Every Moment,
Love Beyond Words,
Laugh Everyday,
~Jennifer


