by Jen_F | How To, Jen_F, Musings
If you have ever tried growing an avocado seed in a cup of water, this post is for you.
Here’s our avocado.
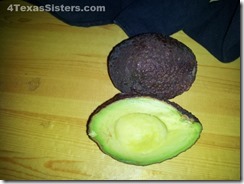
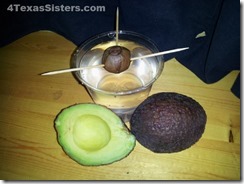
This is the traditional method.
Insert 3 toothpicks into the seed, then place the seed in water
Here’s the other method which I think is great-
Wrap the bottom of the seed in a paper towel or
brown paper bag.
Moisten the paper. Insert the seed in the plastic bag,
close the bag, and then tape it to a window that gets plenty of sun.
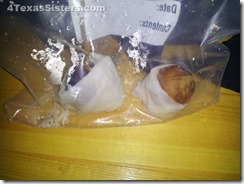
Now you just wait and watch
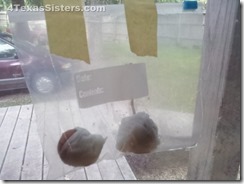
On the right hand side is a seed that has already
sprouted. On the left had side is a new seed.
You never have to worry about adding water because the
moisture stays in the bag, giving the seed the constant
water it needs.
By the way, I’ve done this with Mango seeds also and have a cool Mango tree now growing in a pot.
Til the next time!
You’re never too young or too old… So…
Live Every Moment,
Love Beyond Words,
Laugh Everyday,
~Jennifer
by Jen_F | Fruit, How To, Jen_F
I love apples as a snack and so I’ll cut them up, put them in a plastic container and then snack from the container throughout the day.
This works at home, but when I’m traveling, I hate carrying that extra, really needless, container around, so I dump all my sliced apple pieces in a baggie and of course, by time I am ready to eat my apple, it’s turned brown.
I saw this somewhere recently and just had to try it –
You’ll need four things:
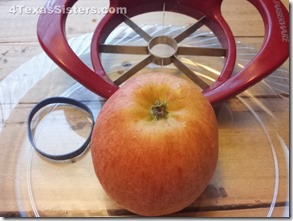
Cutting board
Apple Cutter
Rubber Band
Baggie
Wash your Apple
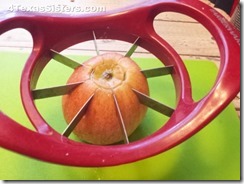
Slice it
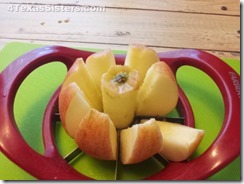
Put it back together, then put it in your plastic bag and you’re ready to travel.
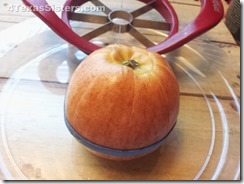
It’s great for kid’s lunch boxes too.
Til the next time!
You’re never too young or too old! So…
Live Every Moment,
Love Beyond Words,
Laugh Everyday,
~Jennifer
by Jen_F | Desserts, Glycemic Index, Jen_F, Recipes
(Originally known as the No Bake Chocolate Cookie)
If you ever did ANY “Sweet treat” cooking in your house, you probably, at one time, whipped up those great little no-bake chocolate cookies that had peanut butter, cocoa, sugar, evaporated milk, vanilla, oatmeal and nuts were optional. Some people even put shredded coconut in them. If you fixed too many of these tasty morsels, you probably over-cooked, under-cooked or just in general had BAD batches. OR Maybe I’m just the only one.
They were fairly quick to fix and yummy to eat, bad batch or not. HOWEVER, they aren’t the most healthy thing, ranking pretty high on the Glycemic Index charts, what with all that sugar.
When I started cutting down my sugar intake, started educating myself on what those things on the label of our foods we buy at the store really mean and stopped buying processed foods (for the most part), my already limited ability to have something sweet declined even more. So, the hunt started.
I can’t honestly say where I got the original recipe for these great tasting No-Bake cookies and I’ve messed with the recipe more than once, but can tell you they will be more kind to your low glycemic needs than the original recipe. So, here we go.
Even if you are diabetic, you’ll be able to eat these delicious little cookie / candy bites. I use Raw Honey most of the time (see below for substitutions). Since the mixture never gets heated, we’re not cooking the health benefits of the Raw Honey out of the mix.
Here’s also the breakdown:
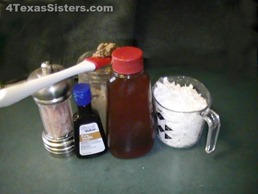 1/2 c Sunbutter, Almond Butter or Peanut Butter
1/2 c Raw Honey or Agave Syrup (if using Stevia, just flavor to taste, they’ll be fine. If you use Stevia and need more liquid to replace the honey, add a little more coconut oil.)
1/2 c Melted Coconut oil
1 Tbsp Pure Vanilla
A sprinkle of Sea Salt
2 c Shredded Unsweetened Coconut (or flaked)
Mix everything together in a bowl except the coconut. Once you’ve got it all blended, stir in the coconut.
— Optional: 2 Tbsp Cocoa Powder (regular or dark works just as well. So does a mix of the two.) And you’re back to the original (healthier style-Low Glycemic) No Bake Chocolate Cookies. (See that recipe here)
I use a round Tbsp to scoop out rounded balls, place them on a tray lined with plastic or parchment paper. Freeze for about an hour then eat. These can be kept in the freezer or refrigerator, but because of the coconut oil, they will get soft if left out on a warm day.
Makes about 25 cookies .(If you noticed in the picture below I’ve got my Dark Hershey’s Cocoa version ready for the freezer.)
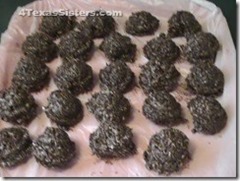
These are great little power balls packed with nutritious, fresh ingredients that will NOT blow your diet program. As with anything, do eat them with moderation. I’d hate for you to write me and say my sweet treats ruined your diet. LOL
By the way, if you’re a dark cocoa fan, jump right in and do the substitution. You may want to cut back the cocoa to 1 1/2 Tbsp though and if you’re not only a cocoa freak but a sweetie too, you can increase the honey by adding up to 2 more Tbsp without making it an ooie-gooie mess that won’t keep its shape.
I only use Sunbutter. Peanut butter has more oil and may make them a bit more runny, so to be on the safe side, you might want to add your oil a little at a time.
If it IS ooie-gooie, just pour them out on a lined cookie sheet, refrigerate for about 5 minutes, score with a dinner knife in the sizes you want, then freeze.
Here they are in bars along with some of the chocolate version. And remember —— Keep them either in the fridge or freezer, otherwise, on a warm day, you might need a spoon. LOL
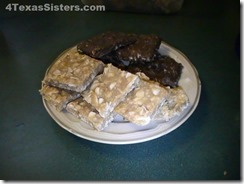
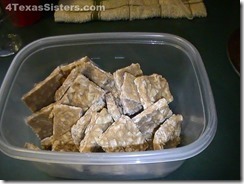
BON APPETIT
Til the next time!
You’re never too young or too old! So…
Live Every Moment,
Love Beyond Words,
Laugh Everyday,
~Jennifer
by Jen_F | Jen_F, Musings
When it came time to have a pet, I’ve always been inclined to want to have dogs over cats. I guess that’s because cats are typically more aloof than dogs.? Dogs seem to learn more “tricks” than cats, too.
Which reminds me of the time Mrs. Triebes (the lady who lived across the street from us in Bellaire) gave me a cat for my birthday. Mother let me keep it in the house most of the time, but things went awry when I made two HUGE blunders.
#1. I tried teaching the cat to sit in the kitchen.? Mother was evidently in the next room and got real tired of hearing me say “sit” “sit” “sit” “sit” “sit” “sit” “sit” “sit” “sit” “sit” “sit” “sit” “sit” “sit” “sit” The cat and I both ended up being banished outdoors for a while. LOL
#2. I thought the cat should eat some of the things I liked, one of which was cantaloupe. If you haven’t ever fed that to your cat, I can NOT recommend it. The cat got diarrhea and left little trails of it on the floor. Not GOOD! I might have been banished from the house to the yard again, but the cat was banished from the house permanently. Whaaaaa !
So, the cat and I spent all our bonding time outside until one day he didn’t come home. Another Whaaa !!!!
Life moved on and so did I.
When I came back to Texas in 2002, I brought my beloved Max and Daniel, two beautiful Shih Tzus, father and son respectively, back with me.
When hurricane Ike hit our area in 2008, we packed up and headed for drier ground in Austin.? We stayed there for almost a month and when we came home, guess what?? I had CATS! Not the household type cats; the wild wood type and because my house is up off the ground, they had taken claim to living under my house. A few years went by b efore we had kittens – 5 of them.. Several years more went by and they all seemed to have found another home. I suppose this is the case since I haven’t seen any of them in several years.
Well… all that changed in the last month. I have a new cat. I saw it laying out in the front yard a few weeks ago. Then I saw it coming out from under the house last week. I thought – hmmmmm. they must be back.
This one does not seem to be wild. the dead give away was when I found it sleeping on the back deck this morning, walked toward it a bit and then it ran up and wanted to rub all over my legs. all the while, purrrrrring away, thinking it was coming in with me.
NOT !
I must be a soft touch for the purring because eventually I decided, against my better judgment, to give it some milk.
LOL
Evidently this cat has more refined taste and has not switched it’s diet to non-dairy because it didn?t like the Almond Milk at all.? Actually that?s a bit of a relief since I shouldn’t be feeding it anyway. I don’t think it’s pure Siamese but definitely has a great deal of the breed in it.
Anyway, I eventually tossed out the milk, exchanging it for water and since I won’t let it come in, it’s taken to laying under the van.
Hopefully it will find its way home soon. If you’re missing a cat, it may be here.
Til the next time !
You’re never too young or too old! So…
Live Every Moment,
Love Beyond Words,
Laugh Everyday,
~Jennifer
by Jen_F | Jen_F, Musings, Our Art
All things being what they are, even though I managed to bring my dressmaker’s body form back with me from my years in Florida, it’s a shy too small in some areas for Shari. (Let me backup to say at this point, it;s been more than a BIT shy small for me for years.) So, Deb went out on the Internet, did some research and learned that she could create her on body form using Duct Tape.
Yes, you heard that right- Duct tape, Texas Fix-it. What I didn’t know and what you may not know is that: (from Wikipedia)
The first material called “duck tape” was long strips of plain cotton duck cloth used in making shoes stronger, for decoration on clothing, and for wrapping steel cables or electrical conductors to protect them from corrosion or wear.
From there, over time, and for different need requirements, the face of Duck tape changed to what we use all the time and call duct tape.
Anyway, back to our regularly scheduled program…
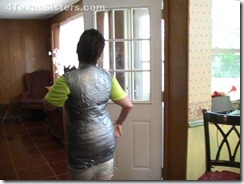
The body form Shari is styling in the video and following out-take pictures is 3 layers. Technically you could say it’s 4 layers if you want to count the T-Shirt… but to talk just about the taping. First layer being applied horizontally, second layer was vertically applied and then the third layer was, again, applied horizontally all in short pieces in each layer.
What wasn’t shown in the video is cutting Shari out of it once they were finished. So just to cover that here, it was a process of taking the scissors and cutting straight up the back.
Deb’s plan, now that the body form is made, is to put it over the the commercial body form I brought back and then put stuffing in between. We’ll let you know how that all works out as we go through the process.
Here are the out-take pictures
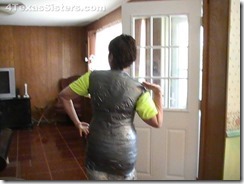
Oh, and if you are wondering why, I, Jennifer Fisher, the video cam girl kept turning the camera sideways, it’s because I was testing out the camcorder Shari gave me and not even sure it was recording all the time. LOL. Think I’ve figured that out now.? 
Til the next time!
You’re never too young or too old…So…
Live Every Moment,
Love Beyond Words,
Laugh Everyday,
~Jennifer
by Jen_F | Discharging, Fabric, Jen_F, Our Art
Having become a part of ItWorks Global a year ago, I’ve been slow to catch on to the “Green, Black, Bling” thing (Green and Black being our company’s primary colors).
It’s not that I don’t like black clothing – in fact I love ALL aspects of anything in the clothing line that is BLACK. It’s the GREEN I’m just not that “all in” to. But, I AM slowly converting over to the idea.
Recently Deb and I were in Wal-Mart so I could do my weekly, catch up, shopping after returning from Shari’s. Deb has these really cool built-in Bra tops that she’s gotten at Wal-Mart over time so I asked her to breeze through the clothing department with me to see if we could find something similar in my size.
Wha-la! we did and that day I came home with 4 tops: one in navy blue, fuchsia, turquoise, and pink (YUK). I had hoped to find one in GREEN, but no luck there. I bought them in a slightly larger size than probably necessary but I don’t like clothes clinging to my skin either.
This last week while I was doing my regular weekly shopping I went back to the clothing department and found a black top in a smaller size that probably fits me better. I bought it with the idea that I would see if I could discharge some of the black out – enough to re-dye green so that I would have something original in the “Green-Black,” bling thing category.
If we were allowed to create our own commercialized tops, I’d get Pat to paint something up for me, but we’re not… however, we can still pick and chose different outfits based on the ‘color’ scheme. So that is where my thoughts were for this project.
Here is what I started with:
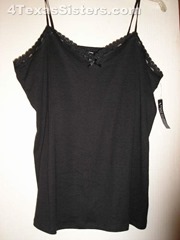
I didn’t think to take pictures of the “in between” process of rubber-banding off the sections in old fashioned tie-dye fashion. Nor did I think to take pictures of the top while I had it in the bleach or vinegar solution.? However, I did take “after pictures” and I’ll tell you about the in between process.
After I got the top rubber-banded, I took a very large clean, plastic bowl and mixed about 1/4 cup bleach with 8 cups of hot water. Then I gently laid the rubber banded portions of the top just barely into the bleach water filled plastic bowl. As you?ll see in my “after pictures,” I did not want to discharge the entire thing.
Once in the bleach bath, I checked the progress every 5 minutes.
If you’re new to discharging, you may not be aware that using bleach as your color-removal agent really breaks down the fabric horribly. And even though the top did not cost a lot, I hadn’t even worn it yet, so did not want to bleach it into pieces. LOL
While I waited for the discharge process to do it’s thing, I got another very large clean plastic bowl and filled it half-full with cold water and a cup of regular vinegar.? Not very scientific in my measurements but there are other sites on the internet that are and they can give you the scientific specifics if you need them. Without doing the research myself, I knew this ratio of vinegar to water would be enough for my purpose. (As well as the bleach bath I made up above.)
Though it did not discharge out to “white,” after 15 minutes I decided, based on the type fabric, that it had been in long enough. I pulled the top out of the bleach and immediately dunked it into the vinegar bath I had made while waiting. I swished the top around in the vinegar water for a few minutes then removed the rubber bands and left it soaking in the vinegar for about 5-10 minutes.
The vinegar bath is one method that stops the bleach discharging process. Some people just rinse the material in clear, clean water and I might have done that if I did not have the vinegar handy.
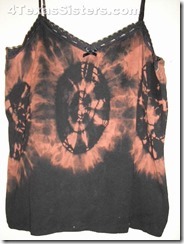
After the vinegar bath, I hand washed it to remove any vinegar smell and then line-dried it in a shady area of the backyard. I could have thrown it in the washing machine, but firing up the washer for ONE piece of clothing just is not my thing.
So here are the results. and even though I don’t think it’s discharged enough to re-dye with green, I like the combination of black and brown.
In the picture, it looks like the black is faded out but it’s not. I think that was just the camera flash that washed it out.
And here’s the back 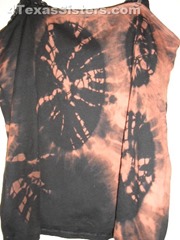
I noticed there’s a fold in the fabric in this picture, so you don’t see the whole design, but over-all, I do love the effect and it turned out very nicely. You should see it off camera. It looks very rich and warm.
Discharging fabric is always exciting, give it a try. In the meantime, I’ll continue to search for a method to create that “Black and Green” bling thing but this project just didn’t turn out to be IT!
PS: Oh, that YUK pink top – I got it with the idea of splashing some blue or fuchsia Seta fabric paint on it.? I’ll let you know if that actually happens.
Til the next time!
You’re never too young or too old! So …
Live Every Moment,
Love Beyond Words,
Laugh Everyday,
~Jennifer


