
Jen’s Now Famous Burritos with Paleo Tortilla
Sorry I don’t have nice pictures. Who knew I would end up sharing this recipe to more than just the family. lol – I do have not so pretty pics down below the article. Next time I make these I will try to remember to take pics as I go. ;-(
I made up this recipe as I went, so just go with your own style — change up the meat, use sausage of your choice, whatever … I’ve used Italian Sausage, turkey sausage and now chicken breast. If you’re a beef eater (which I am not), you could use ground beef or even shredded— same with pork)
You can mix match the beans (red, kidney, black, etc…)
… probably could use shredded cabbage instead of spinach ( I haven’t tried that but am sure it would work) or any vegetable or NO vegetable at all… I used to make them without- but add it now to give Deb a small amount of veggie.
The filling will fill about 24-28 6-8″ burritos and will freeze fine – for each burrito I use a heaping – I say LARGE-LARGE HEAPING tablespoon of the filling
If making for 2 people, I would say do one of three things:
#1 just throw in the serving size of meat you want, with beans, avocado, serving size of spinach, spices to taste and run with it.
#2 Divide the recipe into 3rds
#3 Or make the whole batch below, figure out how much you used for your taco shells or tortillas and then freeze the rest in that size portions.
… but below is what I do for my sister Deb once a month.
Filling:
(2 1/4 lb meat of choice) I used 3 large sized chicken breasts that weighed about 2 1/2 lbs total)- lightly boiled until done- sliced thin across the grain so it’s pretty fine pieces for the most part
Approximately 2 1/2 cups home cooked black beans/red kidney beans or 2 cans black beans/kidney beans STRAINED/drained
2 ripe avocados
Full bag of spinach (this is optional)
garlic, garlic, garlic and a little more garlic
(I use 5 or 6 cloves chopped up)
1 to 2 cup(s) shredded Mexican cheese (cheddar, Monterrey jack, most any cheese would work as I’ve used a variety over the last year)
2 TBS paprika
3 TBS cumin
3 TBS chili powder
1 TBS rubbed sage
1 TBS Oregano
1 tsp ground fennel (optional)
Mash the strained/drained beans
Mash the avocado
Lightly steam spinach and then let cool and squeeze out liquid
Slice, shred or chunk Chicken (your choice)
Dice up the Garlic (I do it to taste, so add or take away as much as you want or leave it out)
Throw everything into a big bowl, stir it up well to mix and then refridge overnight.
NOTE: Filling should be firm, not be ‘soupy’ which is why I drain the beans and squeeze out the spinach.
I let the filling stand in the fridge over night, then make the tortillas the next day.
Once the tortillas are made, get a large serving spoon, dollop a spoonful on the edge or the tortilla, roll it up like an enchilada and set aside. Move on to the next tortilla until they’ve all been filled.
Now you can freeze them (with rolled edge down) or brown them in the skillet and serve (but you don’t have to brown them if you don’t want to. I just like mine crispy on the outside)
Down below is a pic of them in the freezer. As you’ll see, I roll the edges in. It helps keep them from leaking out when browning.
I brown them on four sides, takes about 4-5 minutes for each of the four sides.
Sister Deb eats one at lunch most every day and it’s diabetic friendly.
To make Paleo flourless tortillas: (For the original recipe, go here)
~~~~
Makes: Four 6-8″ Mexican tortillas
Ingredients:
• 2 eggs
• 1 teaspoon melted coconut oil (or melted ghee)
• 1/8 teaspoon baking soda
• 1/4 cup arrowroot powder
• 1 teaspoon coconut flour
• Pinch of salt
* 1/2 tsp cumin
* 1/2 tsp chili powder
Directions:
Crack the eggs into a medium-sized bowl and whisk in the melted ghee.
Add the dry ingredients and beat well to combine. In a small (6-8″) skillet over medium heat, pour in about 1/4 of the batter and immediately roll it around to evenly coat the skillet- flip once it is set on top –(like cooking a pancake)
Here are two rough pics.
#1 I am not a photographer and only have a phone to take pics with
#2 Since I don’t use my ice maker, I took out the bucket and use that area for my freezing of things like this.

This pic is before the spinach is added
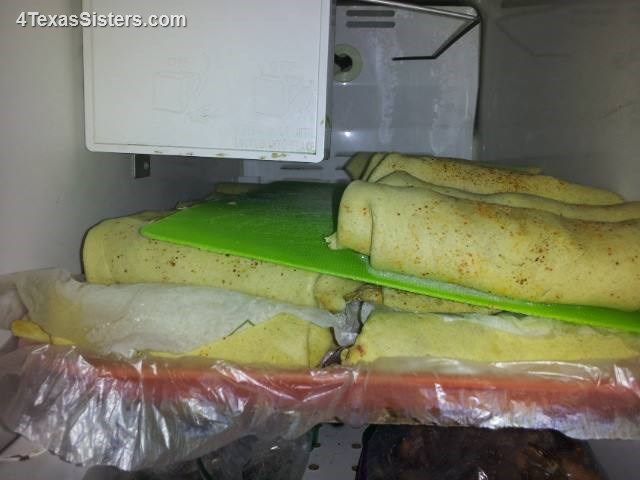
In the freezer. After they are frozen, I put them in baggies, ready to pull out, brown and eat.