by Shari | Cricut Circle, Our Art, Shari_T
The challenge:
You can use any of the sketches from
the magazine or blog to create a card,
layout, decor item, or whatever else you
are inspired to make.
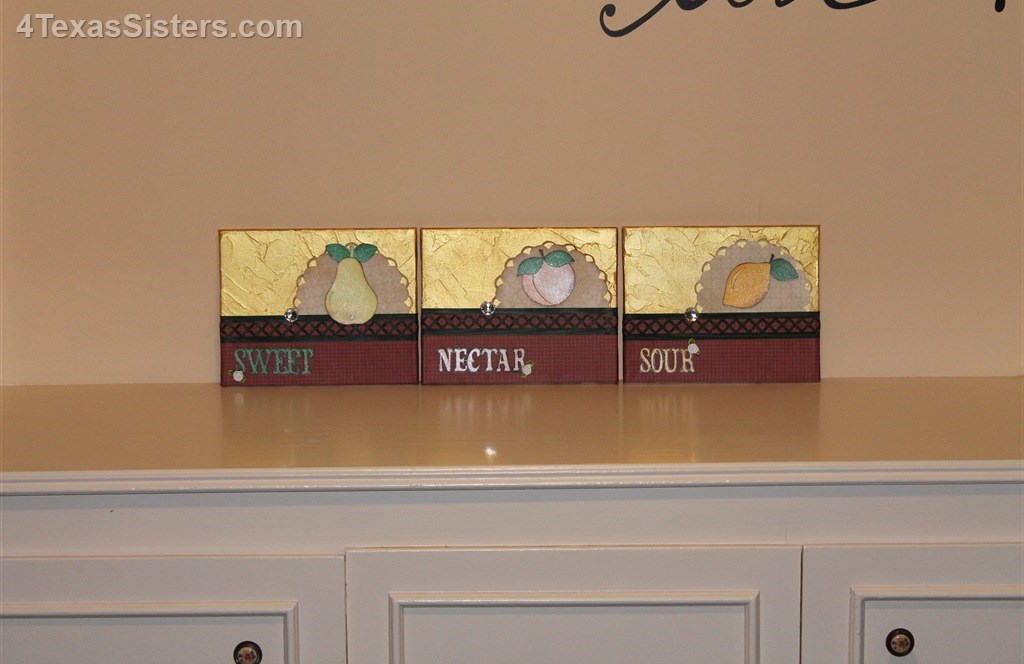
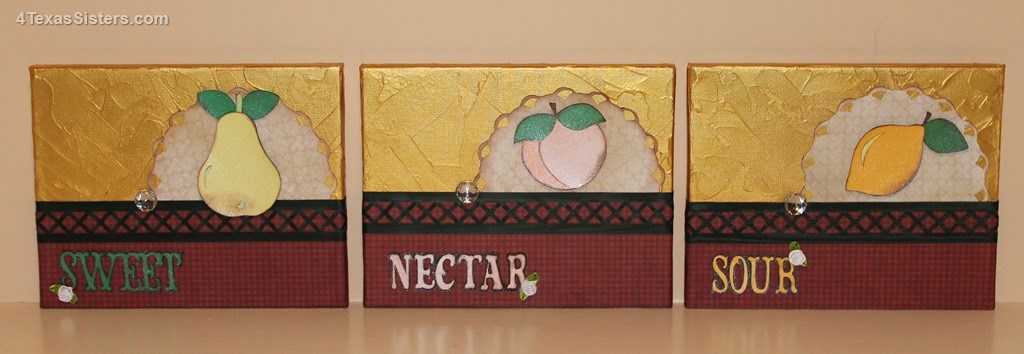
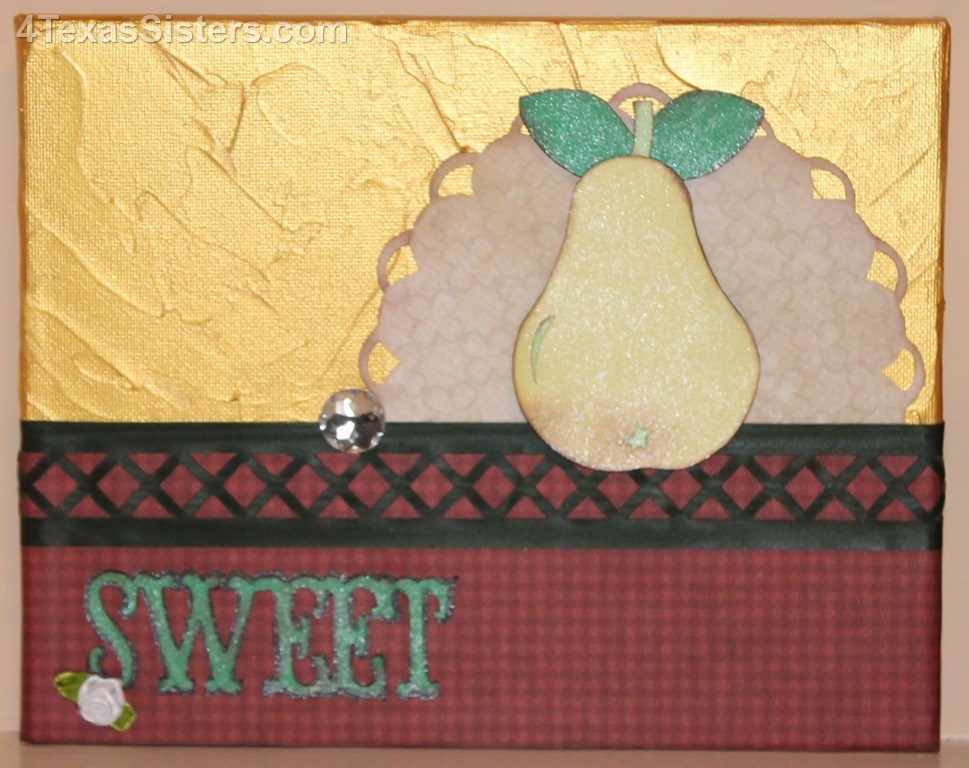
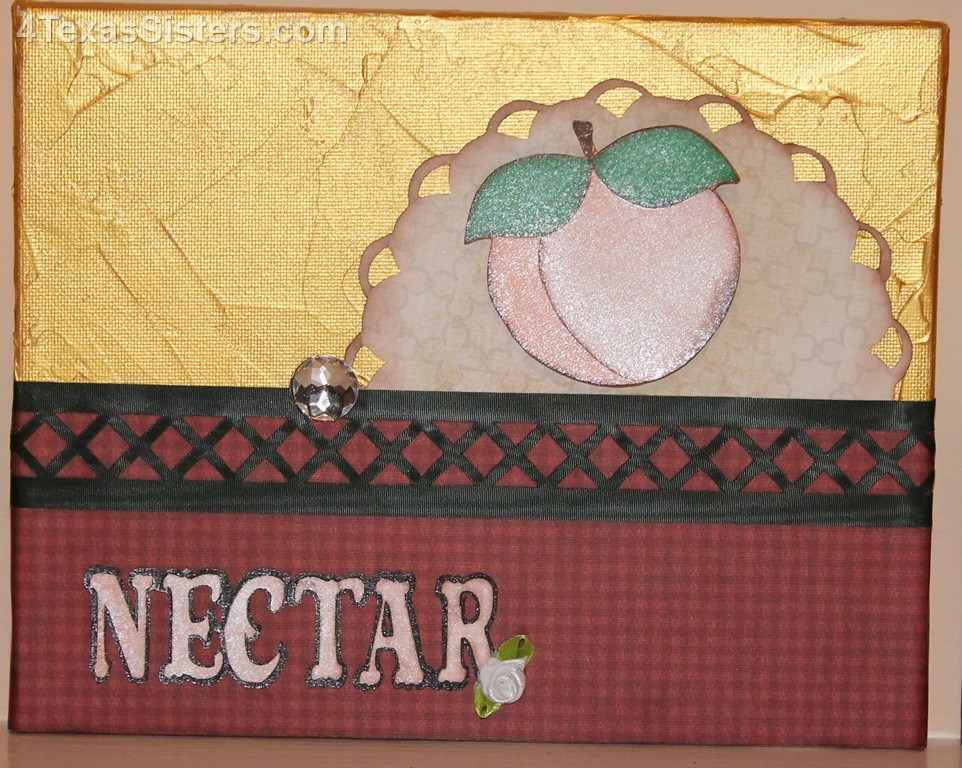
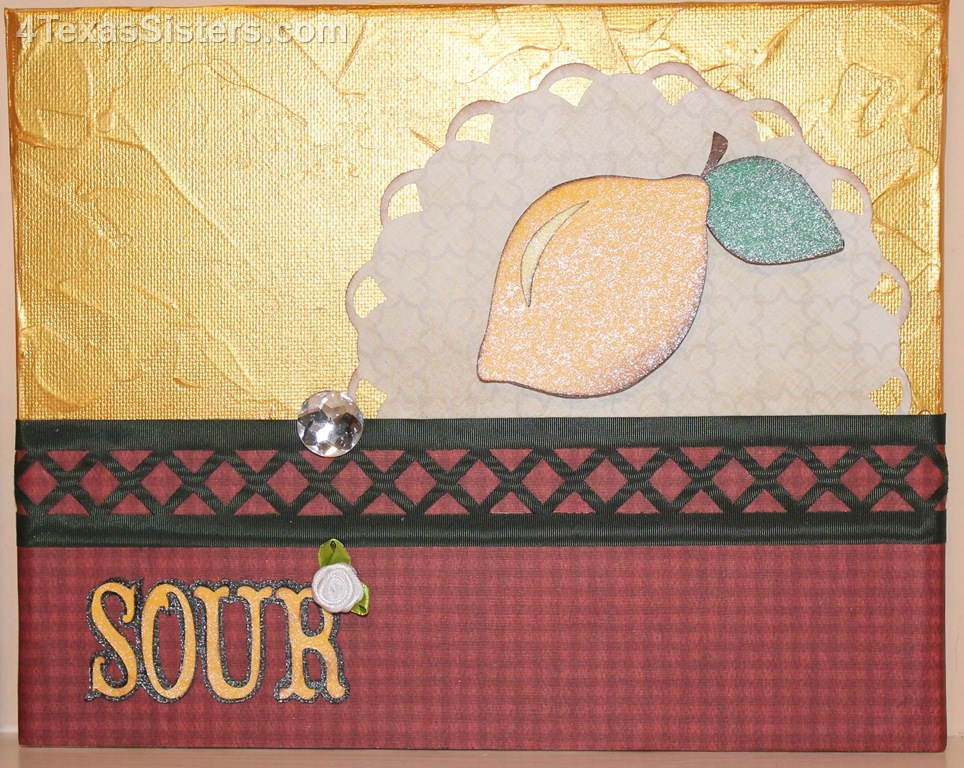
I rarely use sketches in my work, as I’m more of a free flowing, on the fly type, so this was a bit of a challenge for me to come up with something that would fit one of the sketches. In the end, I had been wanting to do a project with fruit for the kitchen/dining room, and this month’s Cricut Circle Magazine sketch by Susan Neal seemed perfect for such a project.
March 8
Here is Susan’s sketch:
And, here’s my project using the sketch:
I wanted to do the projects on canvas, and I loved the idea of having the background look a bit like stucco,. In order to achieve this look, I used an artist’s knife and Liquitex Acrylic Color in Gold. I’ve never been a painter, but this was fun! It reminded me of finger painting, and though I did use an artist’s knife, I had enough on me to look like I’d been finger painting. I only painted the first 2/3 of the canvas, as that was all that was going to show. I let them dry overnight to assure they were completely dry.
The fruits were taken from two different Cricut cartridges: the lemon and peach are from the Savory cartridge, while the pear can be found on the Cricut Just Because Cards cartridge. I took the words (nectar, sweet, sour) off the fruit from the Savory cartridge, and applied them as a separate entity. That allowed me to create the sentiments without using only the fruit on the Savory cartridge. However, each word had a piece of a letter missing as part of the original design. In order to overcome this obstacle, I placed a ribbon flower on each of the words where this occurred.
The fruits and sentiments was inked and shaded, then sprayed with Perfect Pearls Mist in Perfect Pearl. The doily behind each fruit is from the Cricut Elegant Edges cartridge. To add more dimension to the project, I used foam squares on each of the fruits. I added a dark green ribbon with an intricate design and a large rhinestone brad to complete the sketch.
I love all the texture and the richness of the colors of this project.
I hope you enjoy it.
Have a wonderfully crafty day!
Shari
by Shari | Cricut Circle, Our Art, Shari_T
I rarely participate in the Cricut Circle Weekly Challenges, but I have had this home d’cor project in my head for some time, and the challenge rules helped me put my idea into focus. Clay has a very nice apartment in San Antonio while he’s in law school, but nothing whatsoever hangs on the walls. I had the idea to use the Cricut Word Collage cartridge to create some art work for his walls, but never quite pulled it together. When I read this challenge, “Voila!” The project just appeared in my head. Thankfully, it also turned out beautifully.
February 28
The Challenge: Scrap what you love! Include a tag and use the negative space of a Cricut cut
Now, my love here is twofold: 1) I love Clay, and 2) we love traveling, so the use of the Word Collage “Welcome” sign was perfect. We both studied German in high school, and he was stationed in Germany during his years in the Army. Once I had the collage picked out, it was a matter of how to make it all come together.
I used the negative space of the Word Collage, rather than the letters themselves, as the base of the project. Since I did not know what all of the languages, I researched each word that I was not familiar with and jotted down all of the languages used in the collage to say “Welcome.” The following languages, in order of appearance, are: Spanish, English, German, Norwegian, Japanese, Portuguese, Dutch or Afrikaan (from when the Dutch settled in that part of Africa and influenced the language), French, Swedish, Hawaiian, and Italian.
|

|
I have always loved the Cricut Destinations cartridge, but have never had occasion to use it. This was the perfect project for it. I tried to match a destination to each of the languages, but there three languages whose countries were not represented on the Destinations cartridge: Portuguese, Norwegian and Swedish. In order to have 12 destinations to complete the look, I decided to use San Antonio for the USA, since Clay is in San Antonio for law school and Houston because that’s where I live. I also used both Amsterdam and Tanzania to cover the two countries which use the Dutch/Afrikaan translation of “welcome.” That left me with one more needed, so I chose Sydney because they also speak English, and it’s the one place on earth I have always wanted to see.
|

|
In order to meet the tag requirement of the project, I also used the Cricut Fabulous Finds cartridge to cut out 12 luggage tags. I tucked the tag portion behind each of the images, so that all you see is the loop that would fit over the handle of a suitcase.
I had wanted to match the place with the language, but that just wasn’t doable, so I laid them out in a manner that seemed to balance one another.
I know Clay will love it, and it will look great in his apartment.
Now, I have to come up with a project using the letters from the image for the house!
Hope you enjoy the project.
Have a wonderfully crafty day
by Shari | Cricut Circle, Our Art, Shari_T
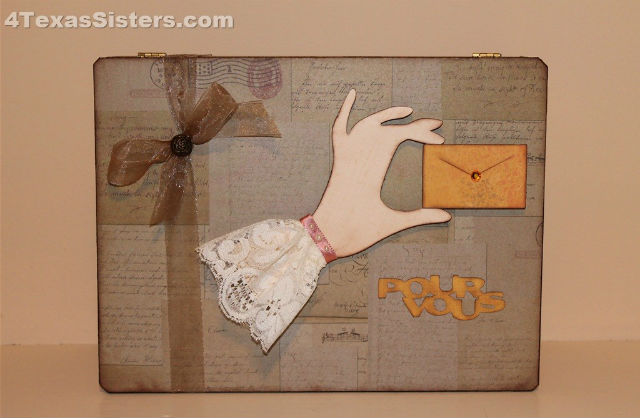
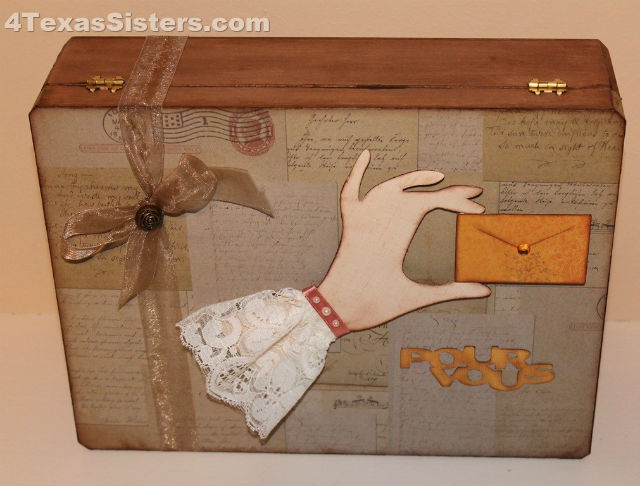
While Clay’s been away at law school, we are often apart for weeks at a time. On the weekends he gets to come home, I send him a handmade card that arrives on Wednesdays; if he cannot make it home, a card also arrives on Saturdays. I’ve made small boxes for every semester that he’s been there which hold the cards, but he had mentioned that some of the cards were too large for the boxes. This month’s challenge was perfect for motivating me to create a larger box for his card collection.
February 27
The Challenge: Create a handmade gift for a loved one using your Cricut machine(s).
I began with an unfinished 12″ x 9″ hinged box, which I stained with Americana Gel Stains in walnut. I then used some vintage looking paper to cover the lid and line the inside of the box to protect the cards from acid, lignen, etc., to keep them from deteriorating too quickly.
The woman’s hand holding the envelope was a perfect selection from the Cricut Sentimentals cartridge for this project. I wanted a softer appearance for the hand, so instead of using the flower on the original design, I added a bit of flare with some vintage lace from my mother’s collection. A little ribbon and some pearls completed the look of a vintage blouse. I also included the phrase, ‘pour vous’, because I just talked to Clay about my learning French; how ironic. The box did not have a clasp to keep it closed, so I used a transparent ribbon and added a vintage rose button (also from my mother’s collection).
I love how the box turned out. It is probably a bit more feminine looking than I intended, but my answer to that: a female made it and the items in it! No matter, I know he’ll love it.
Enjoy and have a wonderfully crafty day!
by Shari | Cricut Circle, Our Art, Shari_T
It’s been awhile since I last posted. The holidays proved to be very busy, and I did not have time for the challenges. However, that doesn’t mean the Cricut has been idle; I’ll be posting some of my projects, including my first attempt at some vinyl wall art, in the coming weeks.
For now, let’s get to the challenge!
The Challenge: Create a Valentine’s Day Card. Include sequins or gems and ribbon.
I absolutely love the little hippo, and I’ve been dying to use it ever since I first laid eyes on it, but never had quite the right card. If I had a Cupid of my own, this is what she’d look like!
To create the card, you will need the following cartridges: Wild Card, Birthday Bash and Beyond Birthdays.
I thought that she looked like she was singing, so the sentiment had to be:
I hope that your Cupid was as good to you as mine was to me. A very post-Happy Valentine’s day to one and all!
by Shari | Cricut Circle, Our Art, Shari_T
The Challenge: Create a project of any kind using your ‘sign/sybmol’ of fall (remember, this can be any fall item that brings that fall feeling to you). You also must include some way of adding texture to your project. Whether you use a cuttlebug, distress the edges, ink, stickles, etc. Your project must include at least 2 different Cricut cuts.
November 6
For this month’s challenge, I made a card using the Word Collage cartridge as the centerpiece. The words are created using the Cri-Kits black metallic pen.
I have also included 2 frames from the Close to My Heart Art Philosophy cartridge and the pumpkins are from the Holiday Cakes cartridge.
Texture was added in a number of ways. All of the cuts were inked to give them depth; the pumpkins were embossed with the Cuttlebug swirls embossing folder; lace and hand-dyed ribbons were added for dimension and to give the card a softer appearance and feel. I used the unprinted side of a paper from the Everyday Kraft pack from The Paper Studio. I loved the harshness of the look and feel against all the softer elements. And, last but not least, another of my mother’s vintage buttons finishes it off.
The holidays are almost here, so it’s back to creating!
by Shari | Cricut Circle, Our Art, Shari_T
The Challenge: Create a Halloween Home Decor project! Your project must include at least 2 different Cricut Image Cuts.
October 30
I was excited to see this month’s challenge was a home d’cor project, as I had already purchased the straw broom to use for Halloween. Of course, I had no idea what I was going to do with it when I purchased it, as I had only a vague picture in my head of how it might be transformed. However, a witch’s broom needs all the accessories of the witch herself, so that made the project come into focus.
The boots were accessorized with some vintage lace (again, from my mother’s collection), hand-dyed ribbon, rhinestones and small paperclips.
To decorate the hat, I used 4 layers of green tulle, which I sewed together for ease of working with it. The hat band was enhanced using hand-dyed ribbon and copper glitter on the buckle. A bow was added to the top of the hat. (This photo was taken before I realized I hadn’t reset the spider; the first photo shows the spider hanging down, rather than sideways.)
The bow was the final touch and included the witch’s accessories, such as a wand and poison potion. I used my new bow maker to create the bow, and I learned that you really need ribbon with a wire to make it easier. Glitter was added to the star on the wand and the “poison” and skull. You cannot see it in the photo, but the bone is white and also glittered. I think I will go back and add some rhinestones to the bottom of the bottle where the holes are.
The project turned out much nicer than I expected, and looks so much better in person than in the photos. Now, we’re ready for all the trick-or-treaters tomorrow night!