by Shari | Musings, Shari_T
I?m afraid that painting the bedroom has taken up most of my time this week, so there was no card to mail to you, Jen, but I hope you are enjoying your birthday.
Did you remember to wear your sexy birthday suit?? (The dress I gave you, not YOUR birthday suit!)
I wanted you to know that I had not forgotten your special day, so I made you a birthday cake!

It was a moist and luscious 2-layer pineapple cake with raspberry lime filling, topped with an Italian meringue and covered in coconut.? There were even cherries on top.
 Sad to say, there are no leftovers.
Now that I think about it, the cake wasn?t really that good because you weren?t here to share it with us.
I hope your day is as special as you!
Love,
Shari
by Shari | Our Art, Shari_T
I’ve been trying to get my craft room cleaned for some time now, and for those of you who know me well, know clean is a relative term. ‘Nuff said
I did clear a large enough section of the art table to be able to create a decorative item for the bedroom. I’m getting ready to paint the bedroom, so this will look great in there with the new color.
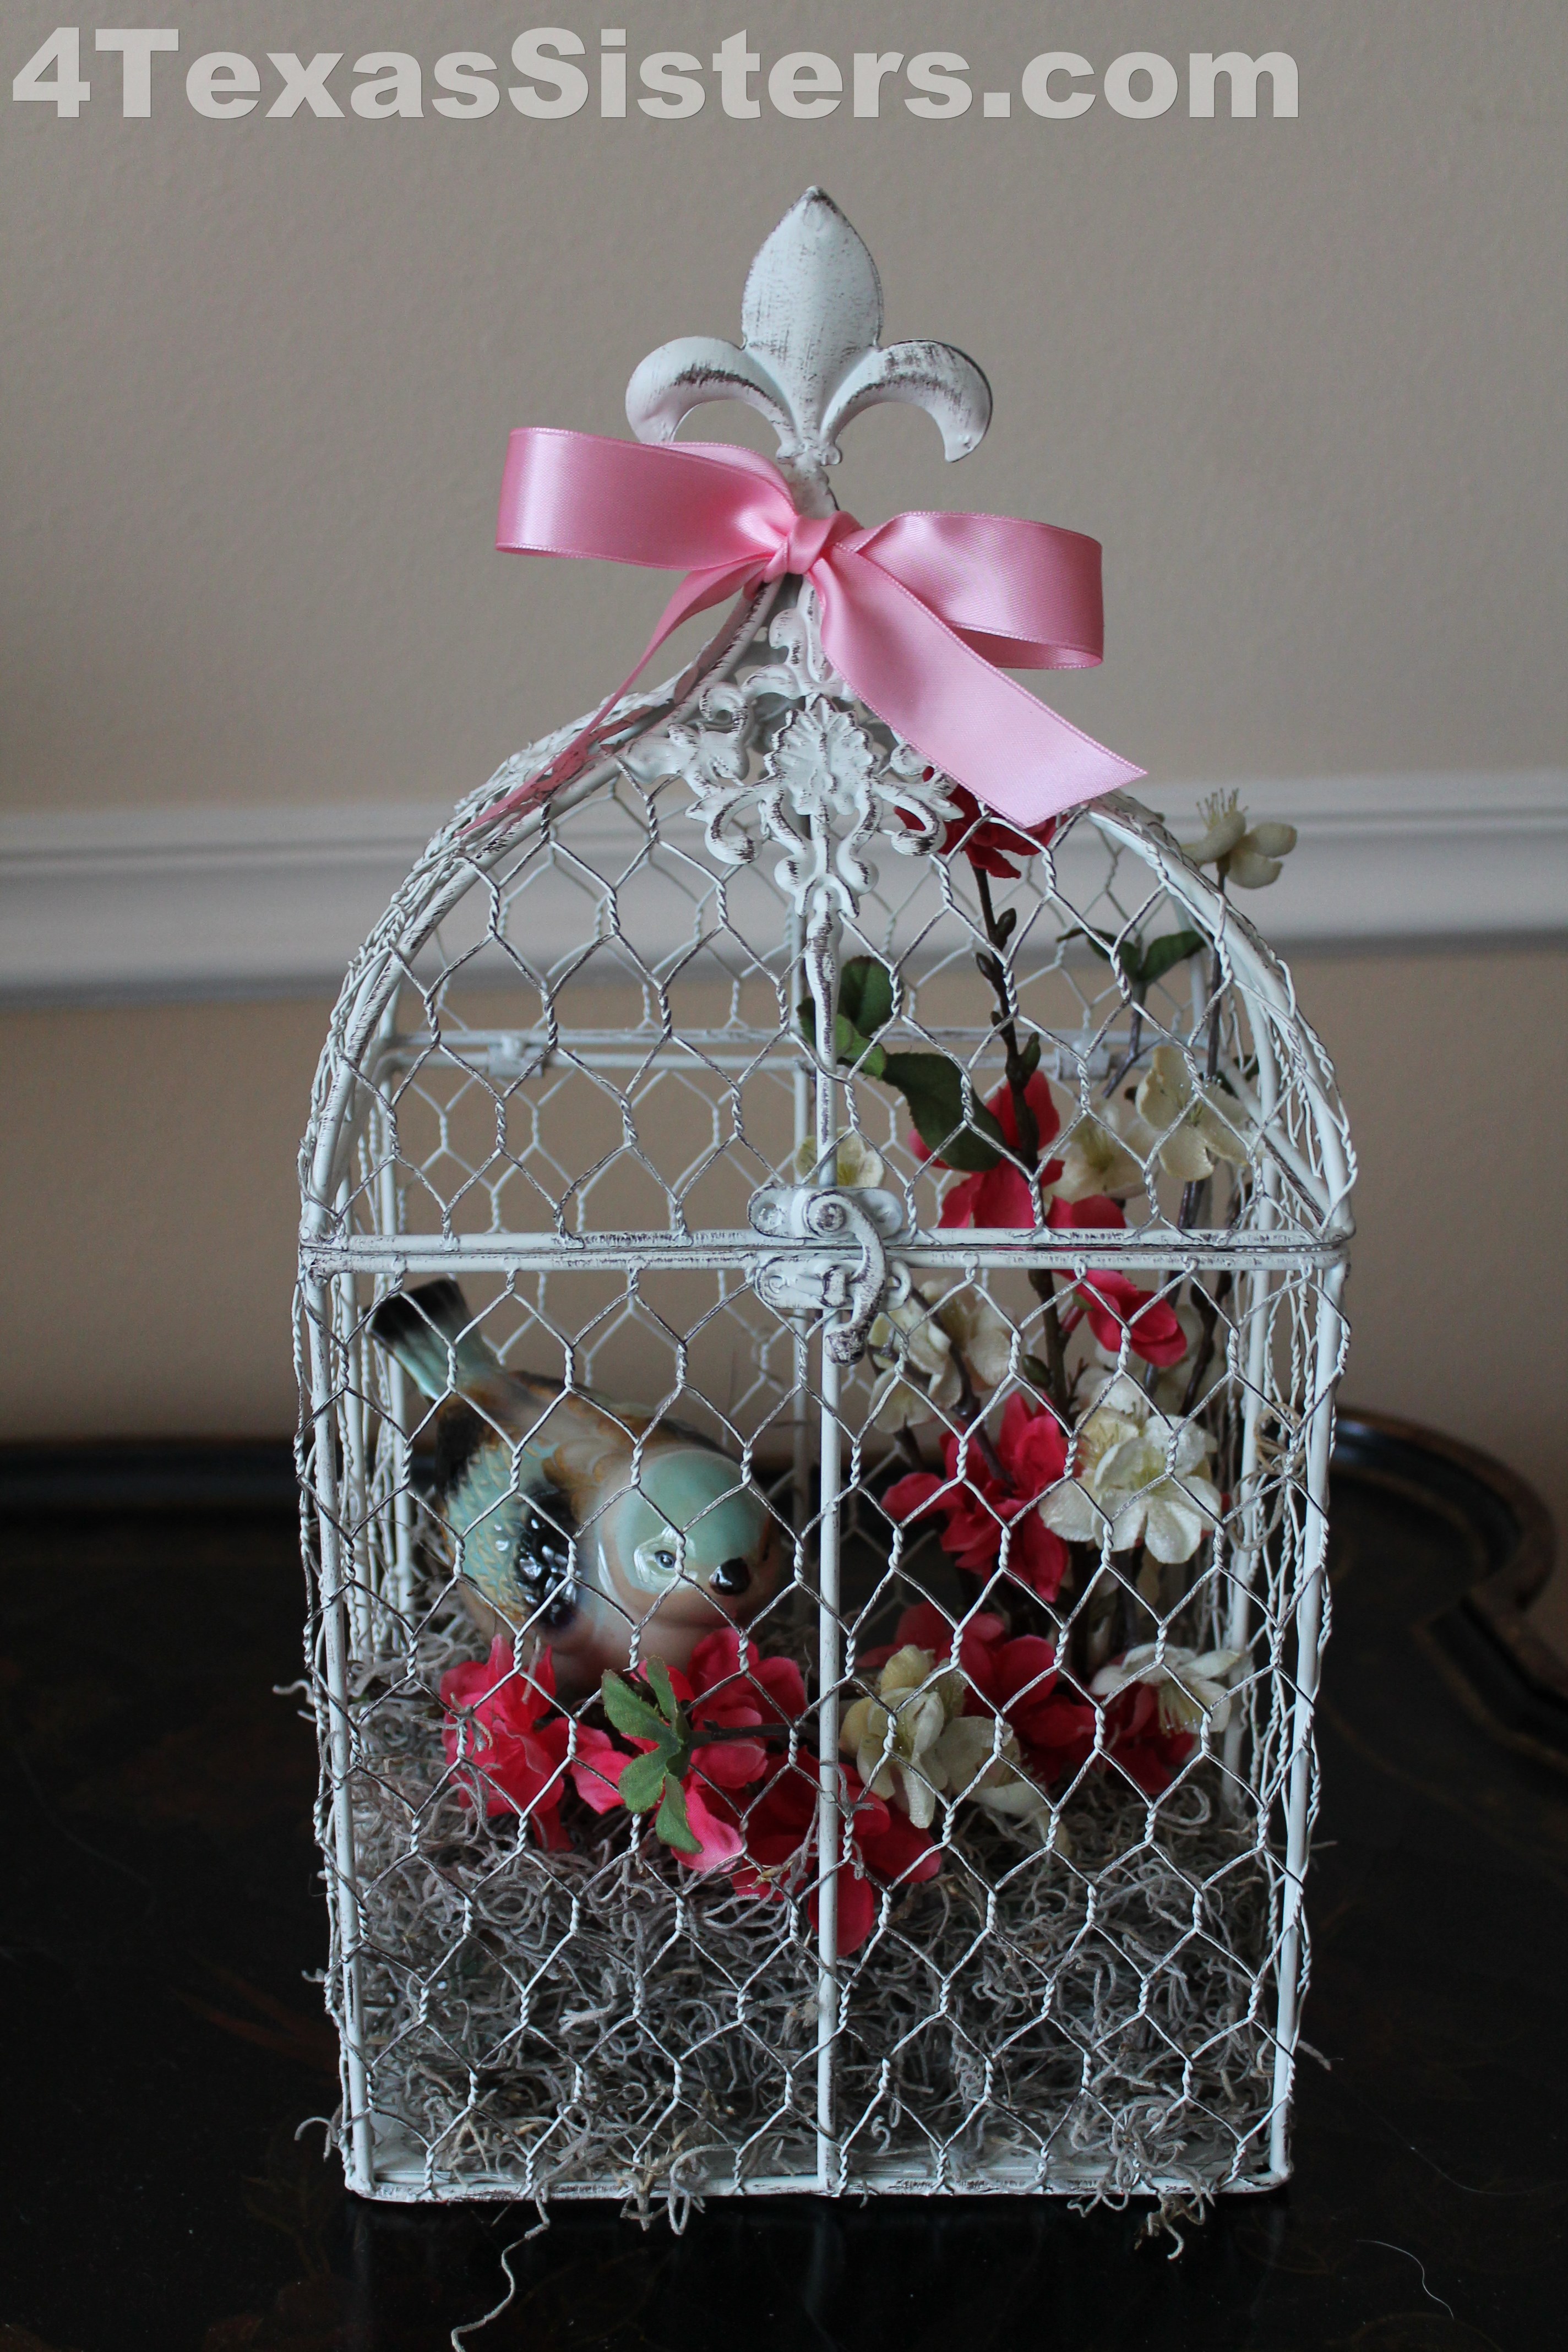
This craft is very simple to make; took about 30 minutes from start to finish.
Here’s what you’ll need:
- Wire birdcage
- Assorted flowers
- Florist’s foam
- Moss
- Crafter’s glue (or a glue gun, if you’re proficient with one on florist’s foam)
- 1 Skewer (a couple of toothpicks would work, too)
- Toothpicks
- Decorative bird
Measure and cut the florist’s foam to fit the bottom of the birdcage. Cut your flowers to the height you wish for the inside of the cage; you may pre-arrange them on the florist’s foam at this time, if you like and place it in the cage to be sure you have the correct height.
Cut a small piece of florist’s foam to set on the back edge; this will serve as the bird’s perch. Pour some glue on the bottom of the small piece and place it on the large block of foam.
Push the skewer into the center of the small block until it goes through the large block and reaches the table. Mark the skewer, then remove it and cut it just slightly below the mark. Return the skewer to the foam. This will help hold the two blocks together while the glue dries and provide a sturdy base for your bird.
Remove the flowers and glue moss all over the foam. I prefer using quick dry crafter’s glue for this since it is less painful than hot glue. However, if you are not as accident prone as I, you might prefer the glue gun method. Return the flowers to the base.
Place the block in the cage and set the bird on his perch.
Add a ribbon around the top, if you like.
There you have it! A quick, easy project in 30 minutes or less. It is going to look great on top of the antique wardrobe in the bedroom, especially once the walls are painted.
Admittedly, I had originally thought about using this as part of the wedding d’cor, but decided I liked the idea of using it at home. The base is not glued down, so it may turn up at the wedding with a different arrangement inside. There’s just no telling with me.
Have a wonderful day!
Love,
Shari
by Shari | Musings, Shari_T
It’s tough to imagine that our mother is 84 years old today. Where has the time gone?? I’m sure she wonders that, too.
I had planned to make my traditional homemade vanilla ice cream for today’s post, but Ryan forgot to put the liner back into the freezer last night. It takes about 20 hours for my liner to freeze, so no ice cream.
I was able to find a small bit of space in the craft room over the weekend to put together a card for her birthday. I need to finish putting everything away in there; it has, after all, been almost a year since I had the floors replaced. Again, where has the time gone?
The Cuttlebug, a die cutting/embossing machine, came in quite handy. I used it to emboss the birds and vines, and then used pastel chalks to color them. I love the way the deckle edging gives the card some character and brings out the center.
I punched a circle out of coordinating paper and embossed it.? I used Inktense pencils to highlight the Happy Birthday.? A little ribbon topped off the centerpiece of this card, and I could not believe my luck in finding the cardstock with the bird in the corner. Perfect!
It made for very simple and elegant card.
Come June, I think our sister time together each month will be taken over by wedding creations.? I’ve spent the past few days looking at invitations, flowers, decorations, etc., we can make using my Cricut.? I can’t wait to begin crafting some fun with my Cricut again. I have missed doing that this past year.
Deb and Jen arrive Monday; I have to decide what’s cooking before then, I guess. I know we enjoyed the buffet of breakfasts, so I may do that, as long as they are up for it. While Jen may be the Queen of the One Pan Meal, I’m the Queen of What Can I Stuff in a Tortilla!
Until next time, live like every day is YOUR birthday!
Love,
Shari
by Shari | Desserts, Musings, Recipes, Shari_T
Once in awhile you get an idea that actually turns out better than you plan. This recipe is one such example.
This recipe is “company dessert”.
It’s that good!
I purchased a couple of pineapples last week, which began a series of thoughts that look something like this:
Pineapple = summer = hot = no cooking indoors = grilling = ice cream.
Naturally, all roads lead back to ice cream. Well, in this case, they lead back to frozen yogurt.
Since pineapple and coconut are a natural pairing in food, it didn’t take long before I was in the kitchen mixing up my latest concoction.
To make the coconut yogurt, you will need one large container of Greek yogurt, a sweetener (I used 2 tablespoons of honey to cut the bitter flavor in the Truvia), coconut flavoring and shredded or flaked coconut (I recommend a finely ground coconut).

First, you will need to mix your yogurt, sweetener, coconut flavoring and coconut in a bowl.

Place yogurt mixture in the refrigerator.
To make the pineapple swirl, you will need fresh pineapple, coconut oil, coconut sugar (or you may substitute brown sugar), pineapple juice, cinnamon and vanilla.

Melt the coconut oil in a skillet over medium high heat. Once the oil is hot, add pineapple to oil and allow to cook until the pineapple softens and just begins to turn brown (about 5-7 minutes).

Stir in the cinnamon, coconut sugar and pineapple juice.

Bring to a boil and allow it to cook until the juice becomes a syrup.

Remove from heat. Stir in vanilla. Set aside and let cool about one hour.

Now it’s time to prepare the frozen yogurt. Place the mixture in your ice cream maker and prepare according to the manufacturer’s instructions.
Just before the yogurt is completely frozen, drizzle the pineapple mixture into the ice cream maker.

Allow the mixture to swirl through the yogurt without actually mixing into the yogurt.

This is truly one of the best frozen desserts I have ever eaten. Daniel claimed this to be the best ice cream/yogurt dessert I’ve ever made.

Shari’s Company Worthy Coconut Frozen Yogurt with Pineapple Swirl
Yogurt base:
- 4 cups plain Greek yogurt
- 1 cup sugar or sweetener equivalent
- 1/4 tsp. coconut flavoring
- 1/2 cup shredded coconut or flakes
Mix all ingredients and place in the refrigerator.
Pineapple swirl:
- 1 Tbls. coconut oil (you could substitute with butter)
- 1/2 cup fresh pineapple (cut into small pieces)
- 1/3 cup coconut sugar (you could substitute with brown sugar)
- 1/3 cup pineapple juice
- 1 tsp. cinnamon
- 1 tsp. vanilla
Heat the coconut oil in a skillet over medium high heat. Add the pineapple; cook until tender and just until the pineapple begins to turn brown. Add the sugar, cinnamon and pineapple juice; bring to a boil and continue to cook until the liquid becomes thick, like a syrup. Remove from heat; add vanilla and stir. Set aside to cool for about 1 hour.
Freeze the yogurt according to manufacturer’s directions. Just before the yogurt is completely frozen, drizzle the pineapple mixture over the frozen yogurt and allow it to swirl into the yogurt. Do not over mix.
Serve and enjoy!
If you do not have an ice cream freezer that allows you to add while freezing, you could do one of two things: add the swirl mixture to the yogurt mixture just prior to freezing, or use the pineapple syrup as a topping. Either way, you’ll still have a wonderful dessert.
I will be serving this to Deb and Jen when they are here visiting later this month. I know they will enjoy it.
Love,
Shari
by Shari | Musings, Pork, Recipes, Shari_T
Finally, I have something to post without “coconut” in the title!
Ever since Deb fixed that luscious tenderloin when she was here last month, I have been looking for new things to try. Easter week was the perfect opportunity to snap up some great deals on meat, including some gorgeous butterfly pork chops.
From there, it was just a matter of time in finding the right recipe, which is not easy in the cyber world where recipes exceed the millions. I narrowed it down to a few contenders, and ultimately chose one from www.spcookiequeen.com . Check out her website to see the original recipe, and all the other fabulous things she has available.
What made this the final winner? It was simple, used items I already had on hand, and would go from pan to dinner in under 30 minutes. Now, that’s my kind of meal.
I realized even Jennifer would like this: you brown and bake the chops in one pan!
Cranberry-Orange Stuffed Pork Chops (an adapted recipe from spcookiequeen.com)
- 4 Butterfly pork chops (split chicken breasts would also work)
- 1 Cup sourdough bread crumbs (I used our weekly homemade bread)
- 2 Tbls. dried cranberries
- 1 Tbls. dried onions (although fresh is always best, this provides a lighter flavor)
- 2 Tbls. coconut oil, melted
- Zest of one orange
- Juice of one small orange
- 1 Tbls. coconut oil (for cooking)
- Salt (to taste)
- Pepper (to taste)
Preheat the oven to 375 degrees.
In a small bowl, combine the bread crumbs, cranberries, onions, coconut oil, zest and juice. This can be made ahead and set in the refrigerator until time needed.

Heat a cast iron skillet (or other oven proof skillet) with 1 Tbls. coconut oil.
Divide the filling among the pork chops. Fold the chops to close them, then seal them with a toothpick. Sprinkle with salt and pepper.


Place the chops in the heated pan and cook for 2 minutes on each side.

Remove the skillet from the stovetop and place in the oven. Bake, uncovered, for 15-20 minutes, or until done. You may use a meat thermometer to check the internal temperature.

I served the chops with some fresh cut pineapple and fresh baby spinach lightly sauteed in coconut oil, olive oil, salt and pepper.

While the recipe was quite simple and quick to prepare, it tasted like I’d slaved for hours. Gotta love that!
And, yet another bonus: the stuffing would blend beautifully with chicken breast. What more could you ask for?
Hope to see you at the table real soon!
Until next time,
Love,
Shari
