by Shari | Musings, Our Art, Shari_T
On August 14, 1958, a bouncing baby boy entered the world, and likely cried, “Mother! Where’s my coffee?”
Okay, I jest but only a bit. That is actually what his Grandfather Sparks said every morning to his Grandmother Sparks when he woke up. She would dutifully hop out of bed and go get it for him. Every morning. No matter what.
Occasionally, Clay tries that with me (only in fun, though), to which I reply, “Out in the kitchen, so go get it yourself.”
Then I paddle off and go make him coffee.
Especially today; it’s his birthday. Or, I would, but he’s still in Georgia.
Clay, because it’s your birthday, I’ll send you a cup of coffee.

Thankfully, he was home last week, so we celebrated then with chocolate cake and a game of Shanghai Rummy. Clay had the highest score, so we declared him the official winner, despite the fact that Daniel actually had the lowest score. Daniel always seems to win our card games; think I best check up his sleeve next time.

Still, I wanted to do something special for Clay today; for without that fateful day in 1958, I’d never have found my one, true love.
So, Clay, this is for you:
Today is your birthday.

Do something fun for yourself.

Take a grand adventure.
?
Spend time with those you love (or can at least tolerate).
?
Enjoy a delicious meal.

Take time to relax.
And while your years (and gray hair) may say “55,”

You’re still driving in the fast lane, Baby!
?
Here’s hoping it’s your best year ever!
(I must confess that these panels are from a larger card/book Clay actually received in 2011; however, I know he won’t mind my sharing it with you, and the original text was different. It was created using the Cricut Crocs Rule cartridge, and made a wonderful backdrop for the card. You can see the original card, in its entirety, along with the original text here, August 2011 Monthly Challenge: Create a Scene. The coffee cup card was created using the Cricut Winter Frolic cartridge.)
Have a wonderful birthday, Clay!

Love,
Shari
by Jen_F | Discharging, Fabric, Jen_F, Our Art
Having become a part of ItWorks Global a year ago, I’ve been slow to catch on to the “Green, Black, Bling” thing (Green and Black being our company’s primary colors).
It’s not that I don’t like black clothing – in fact I love ALL aspects of anything in the clothing line that is BLACK. It’s the GREEN I’m just not that “all in” to. But, I AM slowly converting over to the idea.
Recently Deb and I were in Wal-Mart so I could do my weekly, catch up, shopping after returning from Shari’s. Deb has these really cool built-in Bra tops that she’s gotten at Wal-Mart over time so I asked her to breeze through the clothing department with me to see if we could find something similar in my size.
Wha-la! we did and that day I came home with 4 tops: one in navy blue, fuchsia, turquoise, and pink (YUK). I had hoped to find one in GREEN, but no luck there. I bought them in a slightly larger size than probably necessary but I don’t like clothes clinging to my skin either.
This last week while I was doing my regular weekly shopping I went back to the clothing department and found a black top in a smaller size that probably fits me better. I bought it with the idea that I would see if I could discharge some of the black out – enough to re-dye green so that I would have something original in the “Green-Black,” bling thing category.
If we were allowed to create our own commercialized tops, I’d get Pat to paint something up for me, but we’re not… however, we can still pick and chose different outfits based on the ‘color’ scheme. So that is where my thoughts were for this project.
Here is what I started with:

I didn’t think to take pictures of the “in between” process of rubber-banding off the sections in old fashioned tie-dye fashion. Nor did I think to take pictures of the top while I had it in the bleach or vinegar solution.? However, I did take “after pictures” and I’ll tell you about the in between process.
After I got the top rubber-banded, I took a very large clean, plastic bowl and mixed about 1/4 cup bleach with 8 cups of hot water. Then I gently laid the rubber banded portions of the top just barely into the bleach water filled plastic bowl. As you?ll see in my “after pictures,” I did not want to discharge the entire thing.
Once in the bleach bath, I checked the progress every 5 minutes.
If you’re new to discharging, you may not be aware that using bleach as your color-removal agent really breaks down the fabric horribly. And even though the top did not cost a lot, I hadn’t even worn it yet, so did not want to bleach it into pieces. LOL
While I waited for the discharge process to do it’s thing, I got another very large clean plastic bowl and filled it half-full with cold water and a cup of regular vinegar.? Not very scientific in my measurements but there are other sites on the internet that are and they can give you the scientific specifics if you need them. Without doing the research myself, I knew this ratio of vinegar to water would be enough for my purpose. (As well as the bleach bath I made up above.)
Though it did not discharge out to “white,” after 15 minutes I decided, based on the type fabric, that it had been in long enough. I pulled the top out of the bleach and immediately dunked it into the vinegar bath I had made while waiting. I swished the top around in the vinegar water for a few minutes then removed the rubber bands and left it soaking in the vinegar for about 5-10 minutes.
The vinegar bath is one method that stops the bleach discharging process. Some people just rinse the material in clear, clean water and I might have done that if I did not have the vinegar handy.

After the vinegar bath, I hand washed it to remove any vinegar smell and then line-dried it in a shady area of the backyard. I could have thrown it in the washing machine, but firing up the washer for ONE piece of clothing just is not my thing.
So here are the results. and even though I don’t think it’s discharged enough to re-dye with green, I like the combination of black and brown.
In the picture, it looks like the black is faded out but it’s not. I think that was just the camera flash that washed it out.
And here’s the back 
I noticed there’s a fold in the fabric in this picture, so you don’t see the whole design, but over-all, I do love the effect and it turned out very nicely. You should see it off camera. It looks very rich and warm.
Discharging fabric is always exciting, give it a try. In the meantime, I’ll continue to search for a method to create that “Black and Green” bling thing but this project just didn’t turn out to be IT!
PS: Oh, that YUK pink top – I got it with the idea of splashing some blue or fuchsia Seta fabric paint on it.? I’ll let you know if that actually happens.
Til the next time!
You’re never too young or too old! So …
Live Every Moment,
Love Beyond Words,
Laugh Everyday,
~Jennifer
by Shari | Our Art, Shari_T
I’ve been trying to get my craft room cleaned for some time now, and for those of you who know me well, know clean is a relative term. ‘Nuff said
I did clear a large enough section of the art table to be able to create a decorative item for the bedroom. I’m getting ready to paint the bedroom, so this will look great in there with the new color.
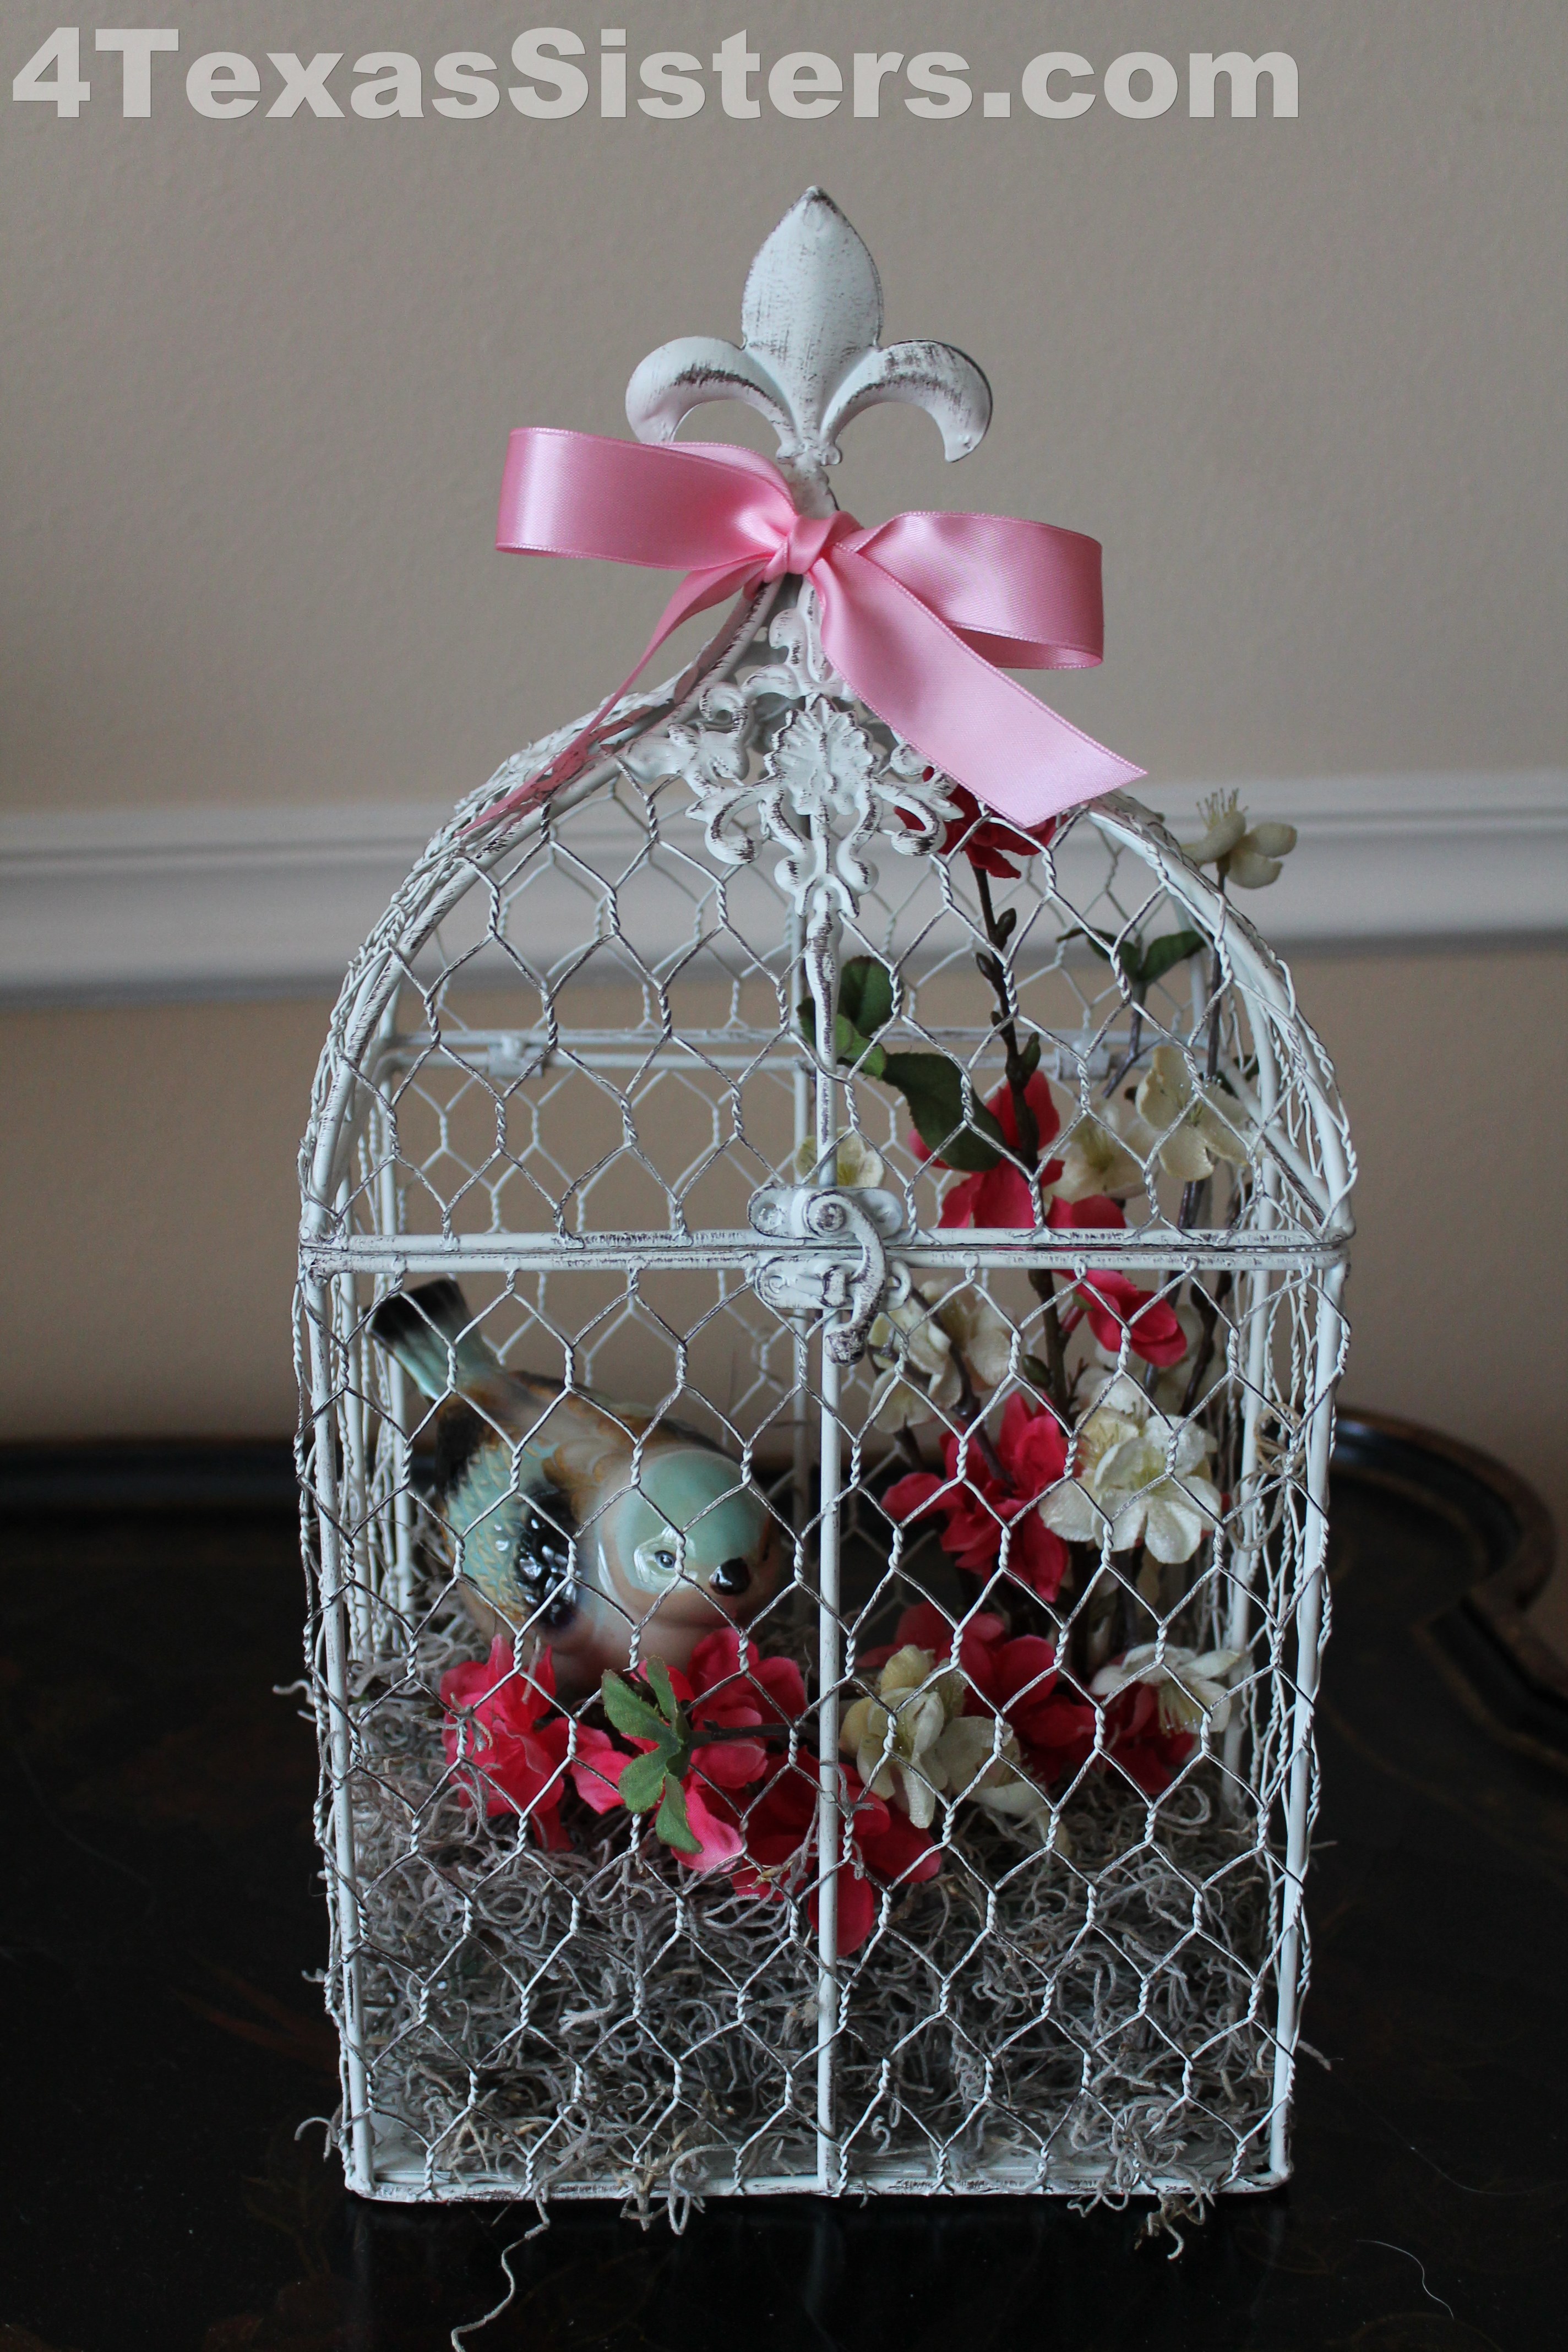
This craft is very simple to make; took about 30 minutes from start to finish.
Here’s what you’ll need:
- Wire birdcage
- Assorted flowers
- Florist’s foam
- Moss
- Crafter’s glue (or a glue gun, if you’re proficient with one on florist’s foam)
- 1 Skewer (a couple of toothpicks would work, too)
- Toothpicks
- Decorative bird
Measure and cut the florist’s foam to fit the bottom of the birdcage. Cut your flowers to the height you wish for the inside of the cage; you may pre-arrange them on the florist’s foam at this time, if you like and place it in the cage to be sure you have the correct height.
Cut a small piece of florist’s foam to set on the back edge; this will serve as the bird’s perch. Pour some glue on the bottom of the small piece and place it on the large block of foam.
Push the skewer into the center of the small block until it goes through the large block and reaches the table. Mark the skewer, then remove it and cut it just slightly below the mark. Return the skewer to the foam. This will help hold the two blocks together while the glue dries and provide a sturdy base for your bird.
Remove the flowers and glue moss all over the foam. I prefer using quick dry crafter’s glue for this since it is less painful than hot glue. However, if you are not as accident prone as I, you might prefer the glue gun method. Return the flowers to the base.
Place the block in the cage and set the bird on his perch.
Add a ribbon around the top, if you like.
There you have it! A quick, easy project in 30 minutes or less. It is going to look great on top of the antique wardrobe in the bedroom, especially once the walls are painted.
Admittedly, I had originally thought about using this as part of the wedding d’cor, but decided I liked the idea of using it at home. The base is not glued down, so it may turn up at the wedding with a different arrangement inside. There’s just no telling with me.
Have a wonderful day!
Love,
Shari
by Shari | Cricut Circle, Our Art, Shari_T
The challenge:
You can use any of the sketches from
the magazine or blog to create a card,
layout, decor item, or whatever else you
are inspired to make.
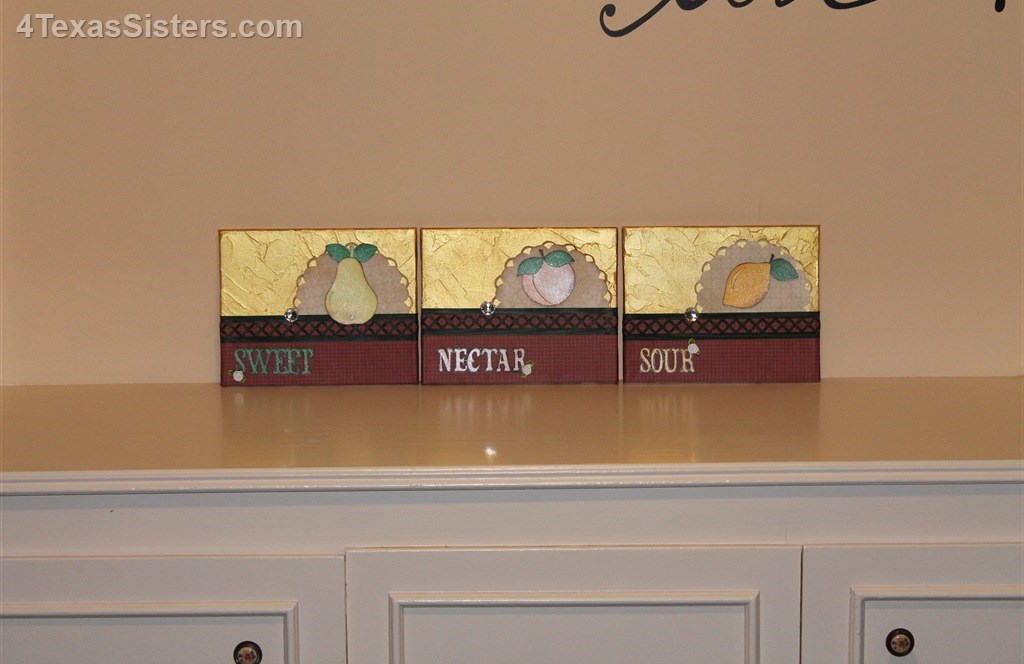
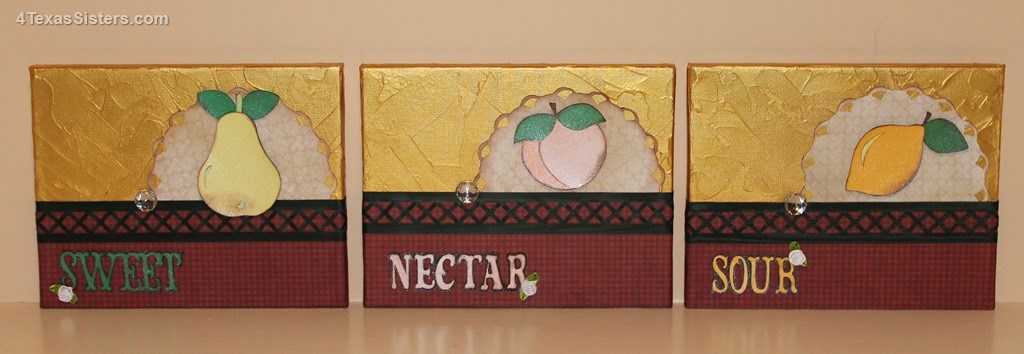
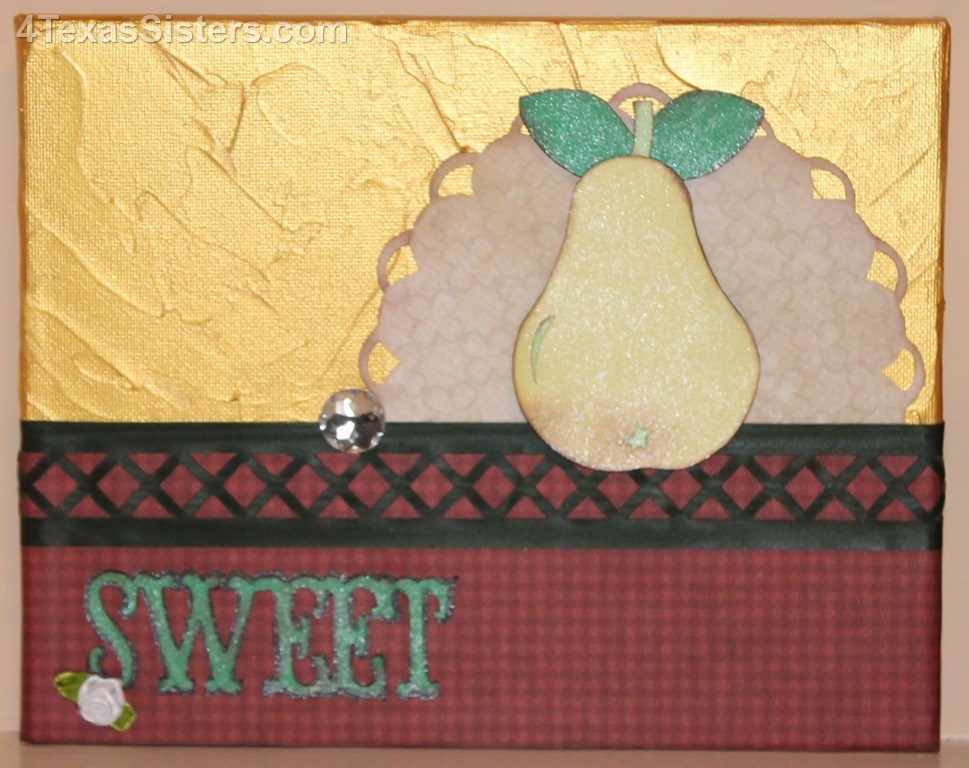
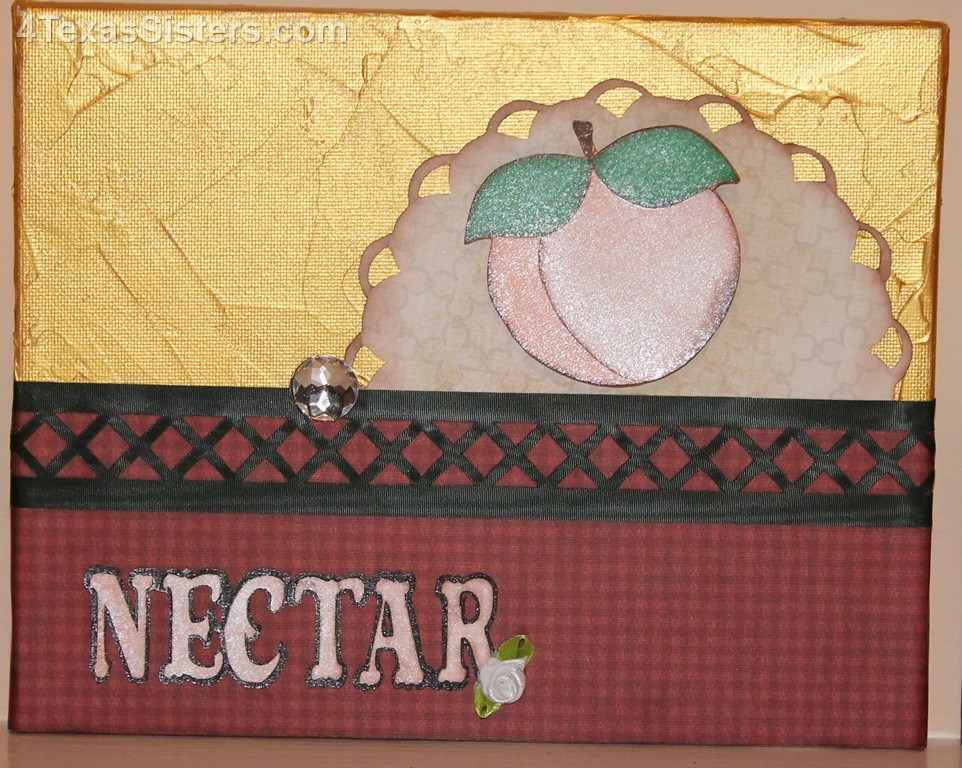
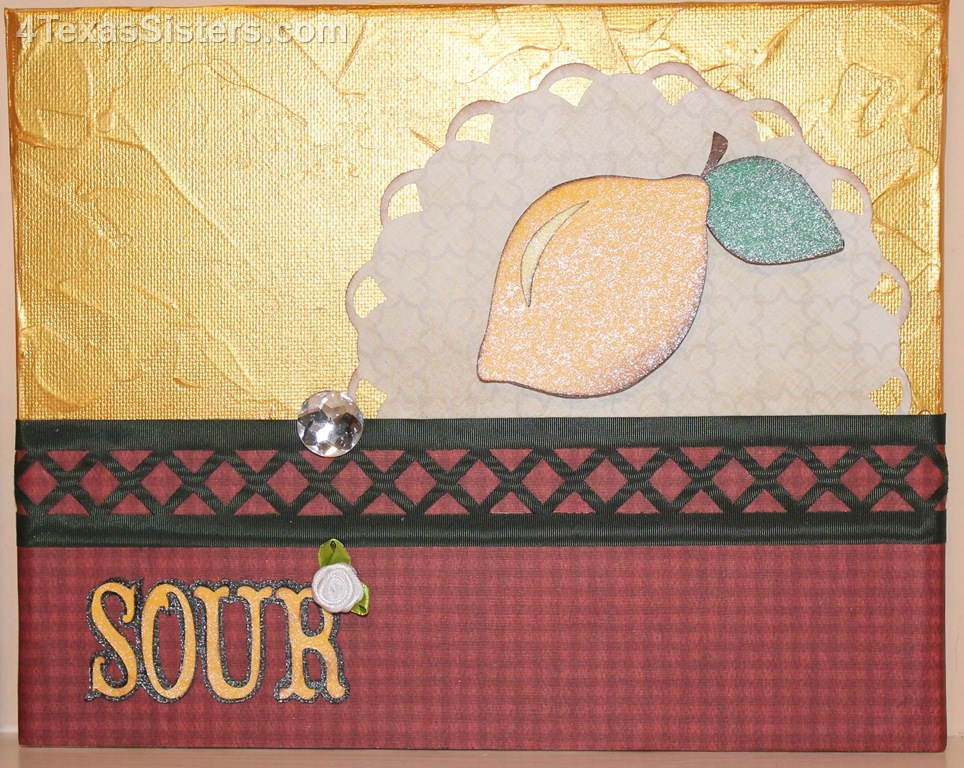
I rarely use sketches in my work, as I’m more of a free flowing, on the fly type, so this was a bit of a challenge for me to come up with something that would fit one of the sketches. In the end, I had been wanting to do a project with fruit for the kitchen/dining room, and this month’s Cricut Circle Magazine sketch by Susan Neal seemed perfect for such a project.
March 8
Here is Susan’s sketch:
And, here’s my project using the sketch:
I wanted to do the projects on canvas, and I loved the idea of having the background look a bit like stucco,. In order to achieve this look, I used an artist’s knife and Liquitex Acrylic Color in Gold. I’ve never been a painter, but this was fun! It reminded me of finger painting, and though I did use an artist’s knife, I had enough on me to look like I’d been finger painting. I only painted the first 2/3 of the canvas, as that was all that was going to show. I let them dry overnight to assure they were completely dry.
The fruits were taken from two different Cricut cartridges: the lemon and peach are from the Savory cartridge, while the pear can be found on the Cricut Just Because Cards cartridge. I took the words (nectar, sweet, sour) off the fruit from the Savory cartridge, and applied them as a separate entity. That allowed me to create the sentiments without using only the fruit on the Savory cartridge. However, each word had a piece of a letter missing as part of the original design. In order to overcome this obstacle, I placed a ribbon flower on each of the words where this occurred.
The fruits and sentiments was inked and shaded, then sprayed with Perfect Pearls Mist in Perfect Pearl. The doily behind each fruit is from the Cricut Elegant Edges cartridge. To add more dimension to the project, I used foam squares on each of the fruits. I added a dark green ribbon with an intricate design and a large rhinestone brad to complete the sketch.
I love all the texture and the richness of the colors of this project.
I hope you enjoy it.
Have a wonderfully crafty day!
Shari
by Shari | Cricut Circle, Our Art, Shari_T
I rarely participate in the Cricut Circle Weekly Challenges, but I have had this home d’cor project in my head for some time, and the challenge rules helped me put my idea into focus. Clay has a very nice apartment in San Antonio while he’s in law school, but nothing whatsoever hangs on the walls. I had the idea to use the Cricut Word Collage cartridge to create some art work for his walls, but never quite pulled it together. When I read this challenge, “Voila!” The project just appeared in my head. Thankfully, it also turned out beautifully.
February 28
The Challenge: Scrap what you love! Include a tag and use the negative space of a Cricut cut
Now, my love here is twofold: 1) I love Clay, and 2) we love traveling, so the use of the Word Collage “Welcome” sign was perfect. We both studied German in high school, and he was stationed in Germany during his years in the Army. Once I had the collage picked out, it was a matter of how to make it all come together.
I used the negative space of the Word Collage, rather than the letters themselves, as the base of the project. Since I did not know what all of the languages, I researched each word that I was not familiar with and jotted down all of the languages used in the collage to say “Welcome.” The following languages, in order of appearance, are: Spanish, English, German, Norwegian, Japanese, Portuguese, Dutch or Afrikaan (from when the Dutch settled in that part of Africa and influenced the language), French, Swedish, Hawaiian, and Italian.
|

|
I have always loved the Cricut Destinations cartridge, but have never had occasion to use it. This was the perfect project for it. I tried to match a destination to each of the languages, but there three languages whose countries were not represented on the Destinations cartridge: Portuguese, Norwegian and Swedish. In order to have 12 destinations to complete the look, I decided to use San Antonio for the USA, since Clay is in San Antonio for law school and Houston because that’s where I live. I also used both Amsterdam and Tanzania to cover the two countries which use the Dutch/Afrikaan translation of “welcome.” That left me with one more needed, so I chose Sydney because they also speak English, and it’s the one place on earth I have always wanted to see.
|

|
In order to meet the tag requirement of the project, I also used the Cricut Fabulous Finds cartridge to cut out 12 luggage tags. I tucked the tag portion behind each of the images, so that all you see is the loop that would fit over the handle of a suitcase.
I had wanted to match the place with the language, but that just wasn’t doable, so I laid them out in a manner that seemed to balance one another.
I know Clay will love it, and it will look great in his apartment.
Now, I have to come up with a project using the letters from the image for the house!
Hope you enjoy the project.
Have a wonderfully crafty day
by Shari | Cricut Circle, Our Art, Shari_T
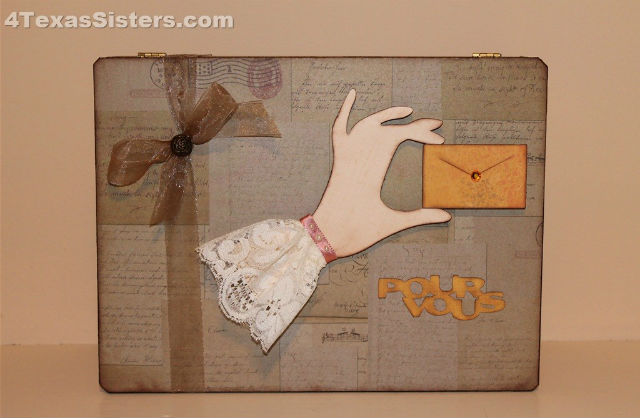
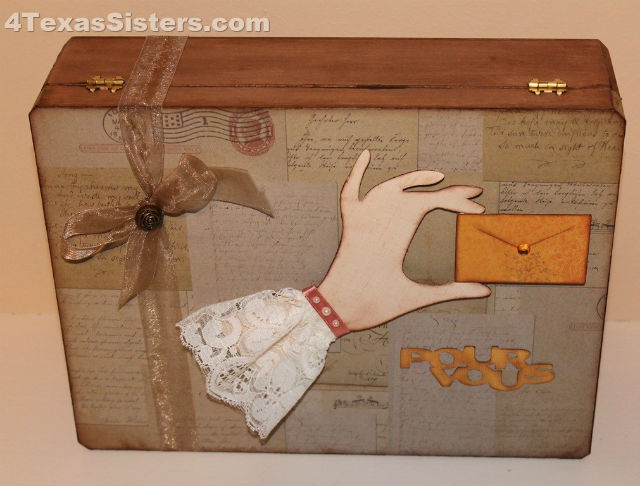
While Clay’s been away at law school, we are often apart for weeks at a time. On the weekends he gets to come home, I send him a handmade card that arrives on Wednesdays; if he cannot make it home, a card also arrives on Saturdays. I’ve made small boxes for every semester that he’s been there which hold the cards, but he had mentioned that some of the cards were too large for the boxes. This month’s challenge was perfect for motivating me to create a larger box for his card collection.
February 27
The Challenge: Create a handmade gift for a loved one using your Cricut machine(s).
I began with an unfinished 12″ x 9″ hinged box, which I stained with Americana Gel Stains in walnut. I then used some vintage looking paper to cover the lid and line the inside of the box to protect the cards from acid, lignen, etc., to keep them from deteriorating too quickly.
The woman’s hand holding the envelope was a perfect selection from the Cricut Sentimentals cartridge for this project. I wanted a softer appearance for the hand, so instead of using the flower on the original design, I added a bit of flare with some vintage lace from my mother’s collection. A little ribbon and some pearls completed the look of a vintage blouse. I also included the phrase, ‘pour vous’, because I just talked to Clay about my learning French; how ironic. The box did not have a clasp to keep it closed, so I used a transparent ribbon and added a vintage rose button (also from my mother’s collection).
I love how the box turned out. It is probably a bit more feminine looking than I intended, but my answer to that: a female made it and the items in it! No matter, I know he’ll love it.
Enjoy and have a wonderfully crafty day!